Bulk Mapping
Bulk Mapping allows Canopy users to import entity data from structured spreadsheets containing high-volume tabular data, and map it directly to documents processed within Canopy. This is a useful tool for Tenant Admins, Project Admins, and Review Managers conducting manual review phases in Canopy.
Bulk Mapping is especially helpful when a project contains large documents with long, uniform lists of entity data, such as Employee Information lists, Customer databases, or Monthly Sales reports.
With Bulk Mapping, you can upload an unlimited number of spreadsheets in a single session. Once mapped, the target documents in Canopy are automatically added to a Manual Review batch labeled Bulk Mapping.
Canopy offers two distinct workflows for bulk mapping:
Each uploaded spreadsheet maps directly to a single document in Canopy.
- Requirement: The spreadsheet’s filename must match the exact Document ID of the target document within your specific Project and Tenant.
A single spreadsheet can be mapped to multiple documents in Canopy.
- Requirement: The spreadsheet must contain a dedicated column for Document IDs. Canopy will parse this column to identify which documents in Canopy should receive the entity data on a row-by-row basis.
Bulk Mapping requires two components: target documents that have already been processed in Canopy and correctly structured spreadsheets prepared for upload.
Before beginning the mapping process, you must identify the specific documents within Canopy that you want to bulk-map entity data to. These can be any files containing tabular data - including Excels, CSVs, PDFs, and Word documents - and they are categorized as “mappable” in Canopy.
- Action: Locate your target documents, download them, and record their Document IDs.
- Why: These unique IDs are the “link” between your uploaded spreadsheet and the target documents in Canopy. Depending on your chosen mapping method, you will apply these IDs either as your file names or within a dedicated column in your uploaded spreadsheets.
Any files containing tabular data with uniform lists of entity data are eligible for Bulk Mapping in Canopy. You can identify these documents in line with your Assessment process or follow the steps below:
- Filter for Mappable Files
- Navigate to the Documents page.
- In the Filter Panel, scroll to Mappable Type category.
- Select All Mappable or filter by specific file types like PDF or Excel.
While you can record IDs manually, the most efficient way to prepare for Bulk Mapping is to export your target documents using the Document ID as the filename.
- Initiate Export: Once your target list is filtered, click the Export button.
- Configure Export Settings:
- Select the Documents tab.
- Set File naming convention to Document ID.
- Set File format to Native files.
By doing this, your exported target documents are automatically named with their unique Document IDs, preserving this critical information for when you are ready to initiate bulk mapping later on.
Canopy supports Excel (.xlsx) or CSV (.csv) formats for Bulk Mapping uploads. If your exported native documents are in a different format (such as PDF or Word), you must extract the tabular data and save it as an Excel or CSV file before beginning the upload process.
Additionally, to ensure successful Bulk Mapping, every spreadsheet uploaded into Canopy must meet the following criteria:
- Header Row: The first row of each spreadsheet must be the header row.
- Field Correlation: Each mapped column must directly correlate to one field in the Canopy Entity List.
- Validation: All spreadsheet values must conform to the field validation rules (e.g., date formats, character limits).
- Single Sheet Mapping: Canopy only map the first sheet of the uploaded spreadsheet. Therefore, users must consolidate all the data into the first sheet.
Keep the scale of your data in mind. For datasets with more than 1 million rows, we recommend converting your data to a CSV file to bypass Excel’s row limit.
Native data often requires cleaning before it can be uploaded and mapped.
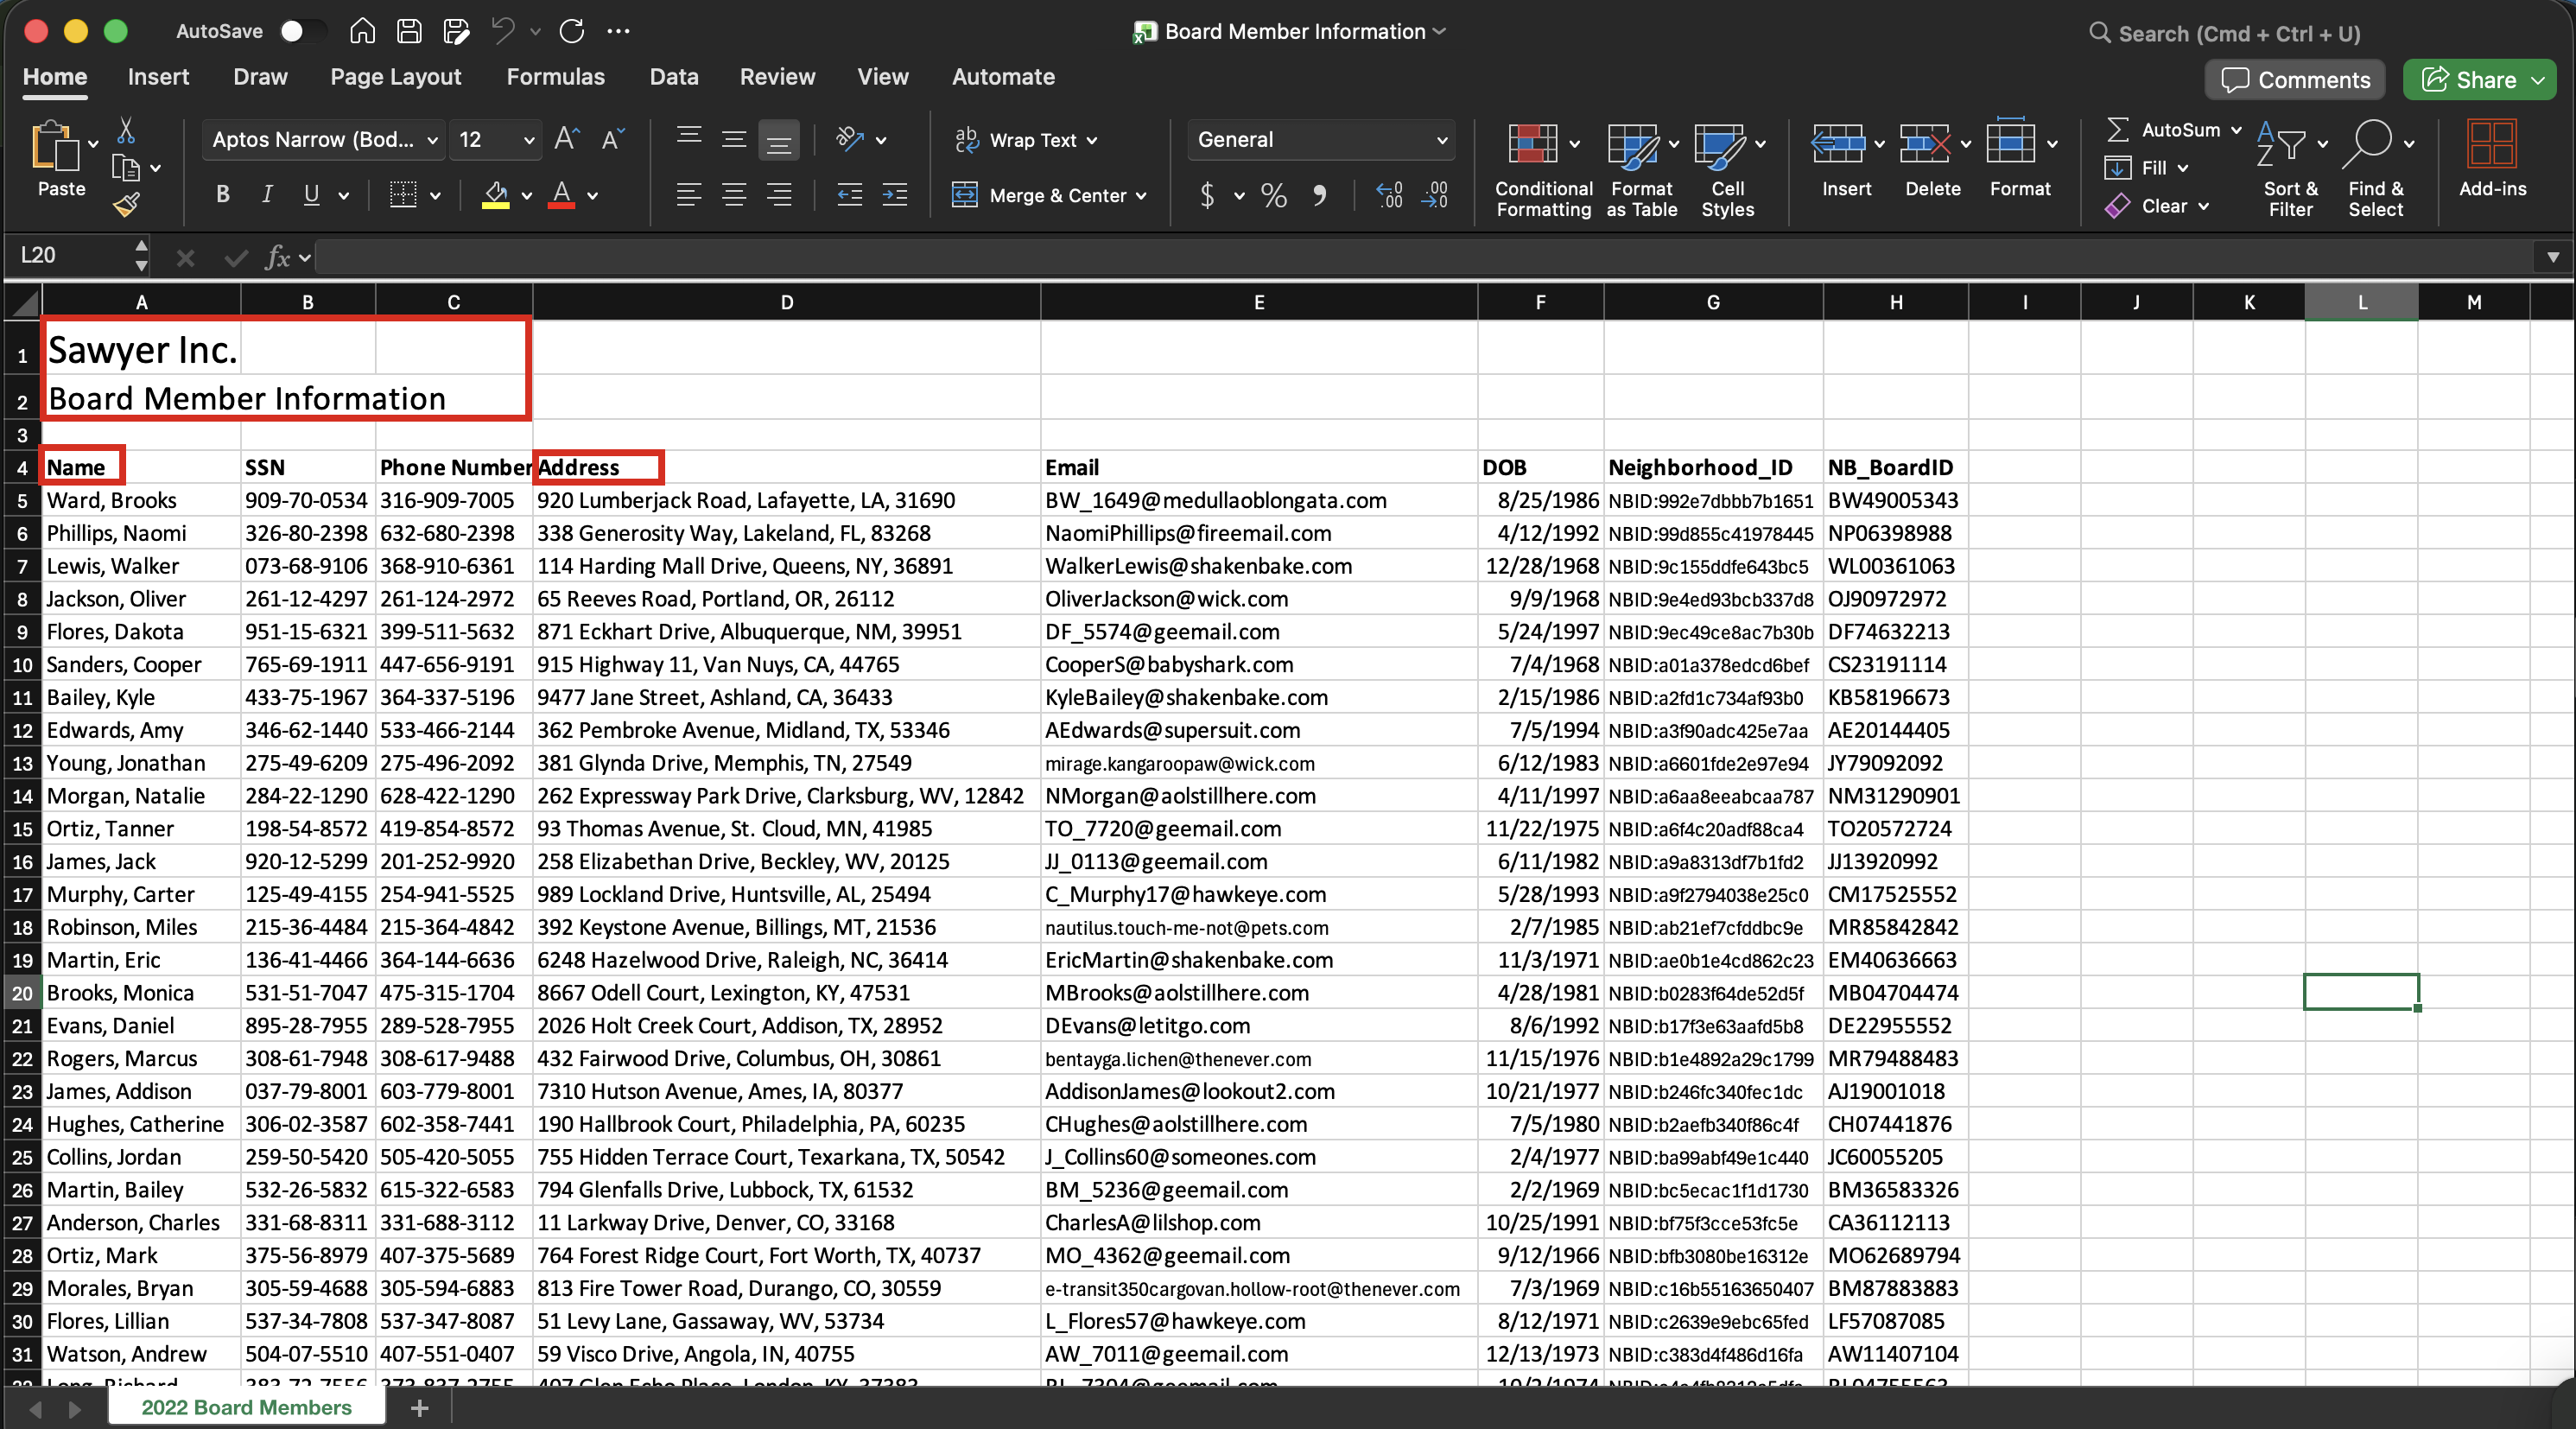
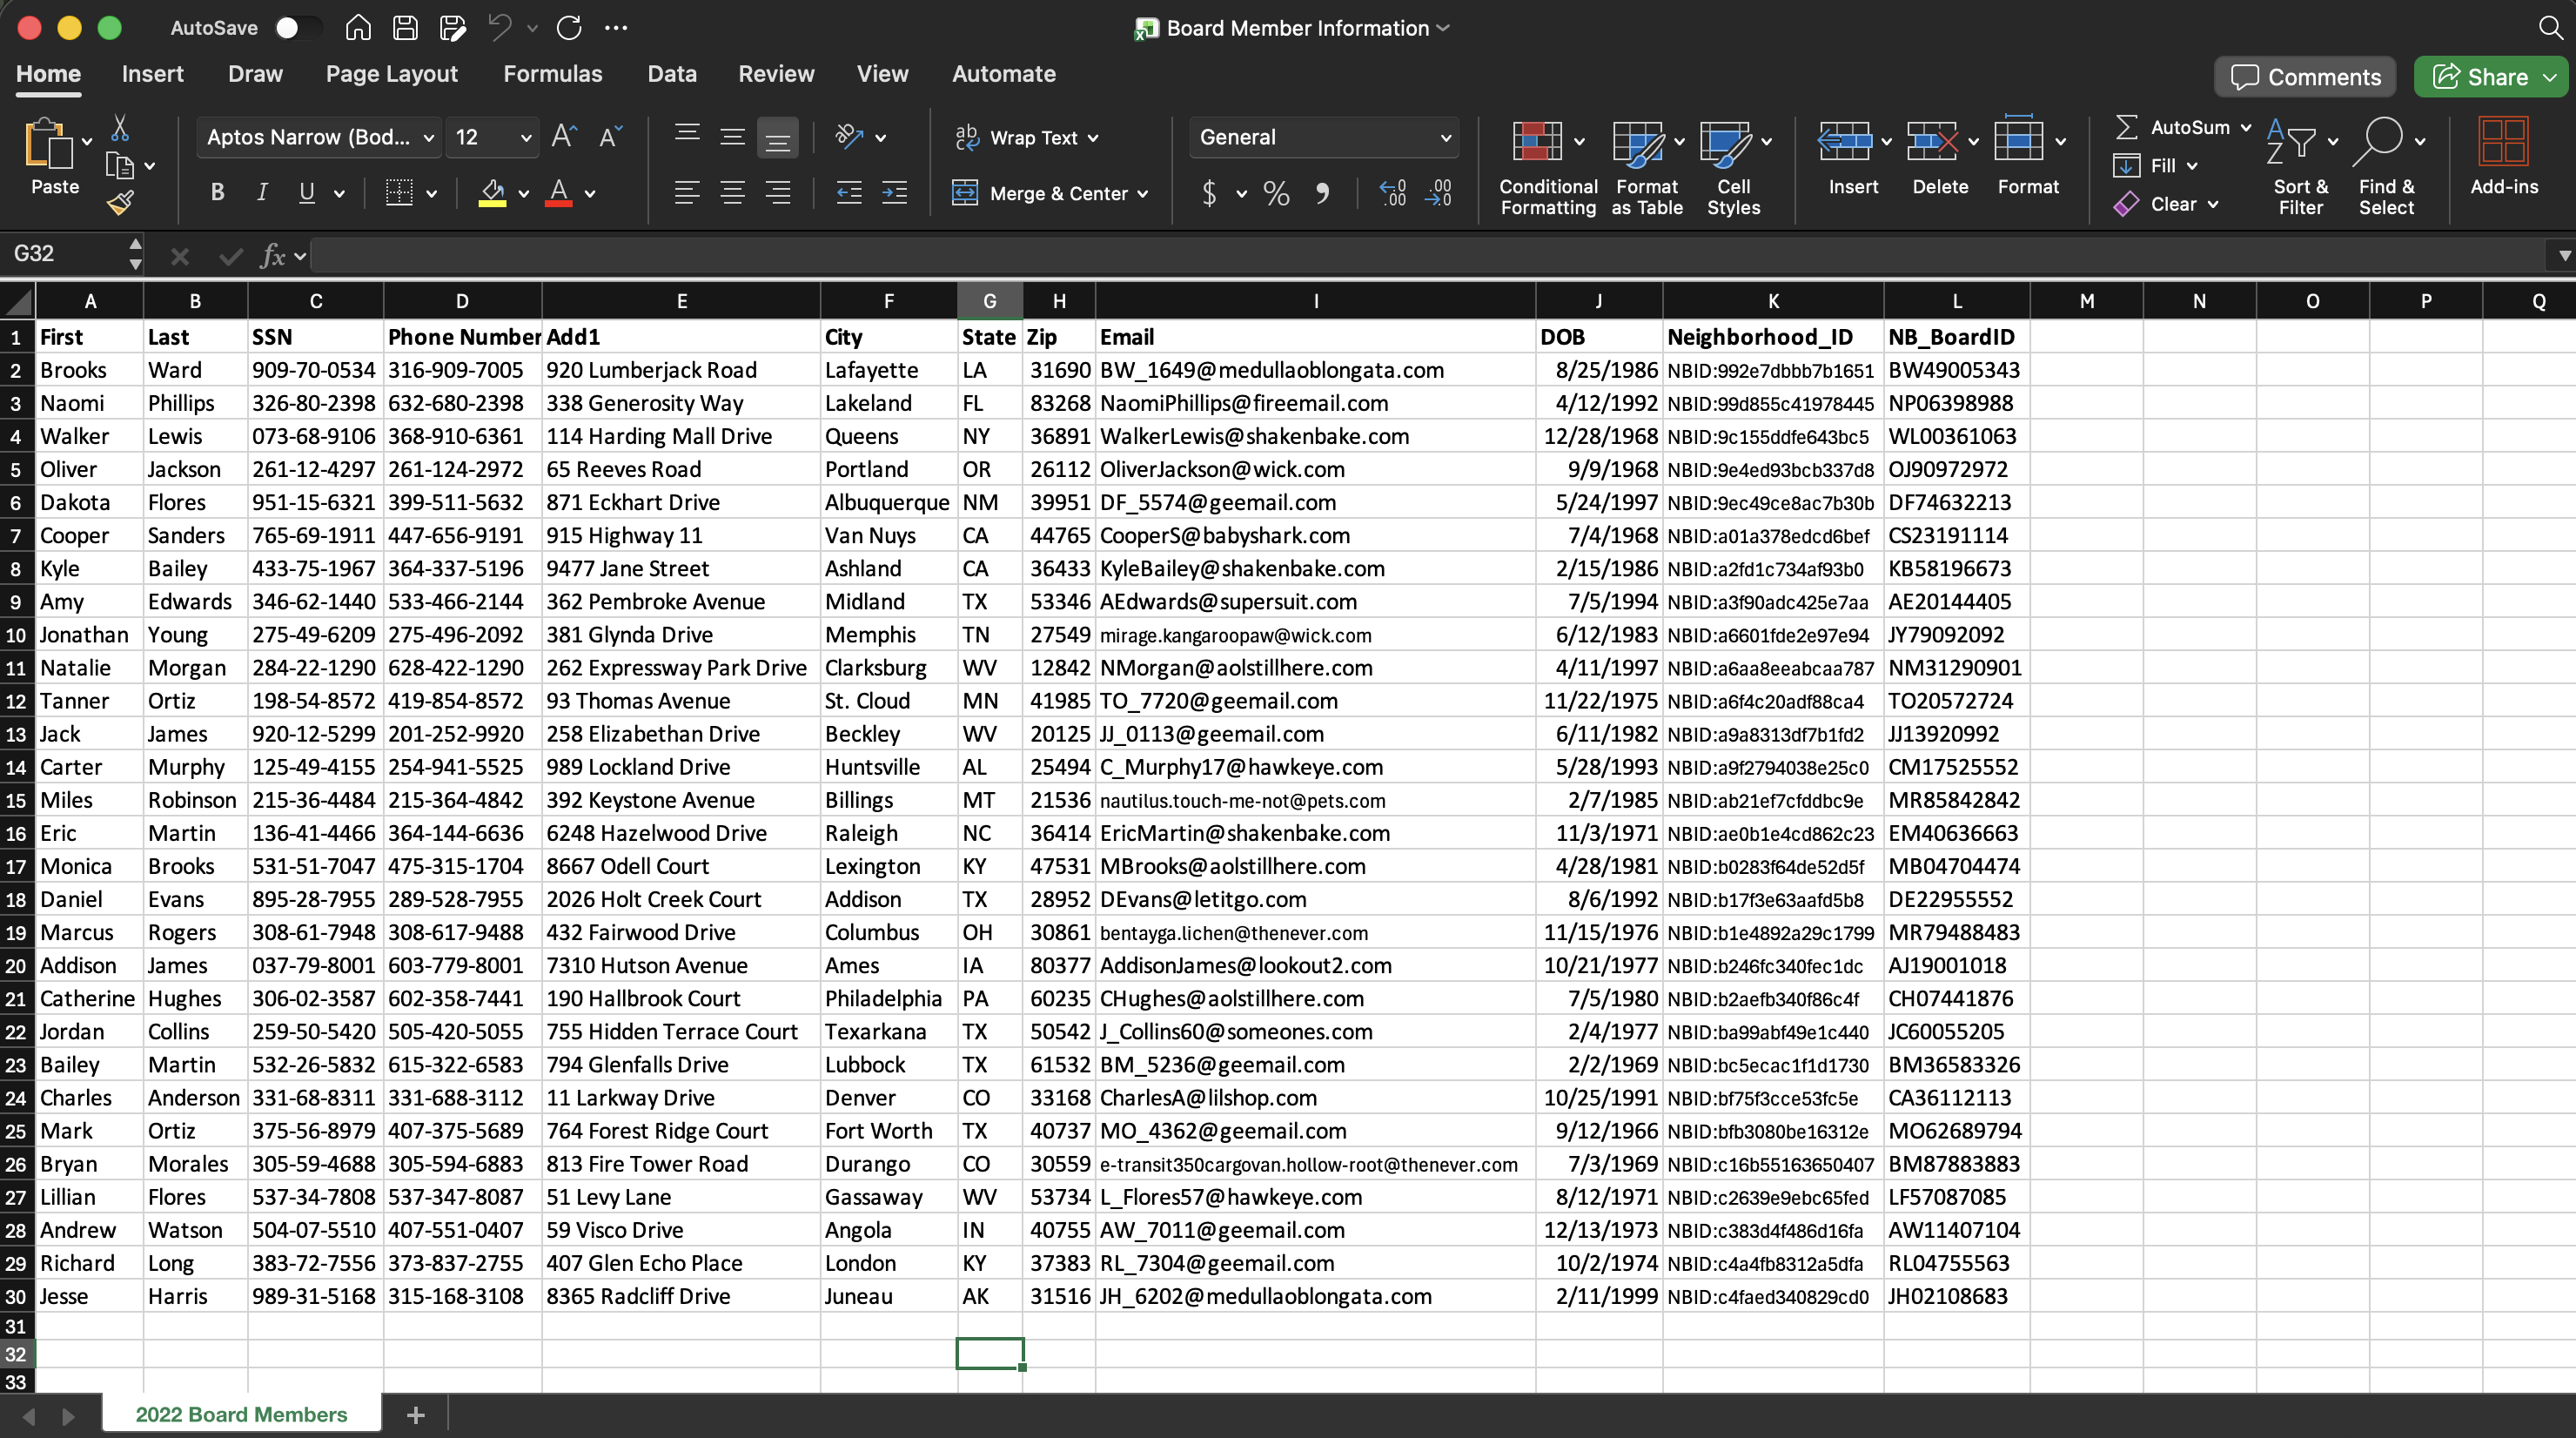
For example, the first and second rows of the spreadsheet below are not the header row; therefore, you must delete the first two rows so that the first row is the header row. Additionally, if the document contains a single column for “Full Name” or “Full Address,” you must split that data to match Canopy’s field structure:
Names: Separate “Name” into First Name and Last Name columns.
Addresses: Separate “Address” into street Address, City, State, and Zip Code.
Before
After
| Method | Filename Requirement | Column Requirement | Example |
|---|---|---|---|
| Document ID as File Name | Filename must be the Document ID, e.g., fc44a2e6d44440d | Standard Entity Fields | 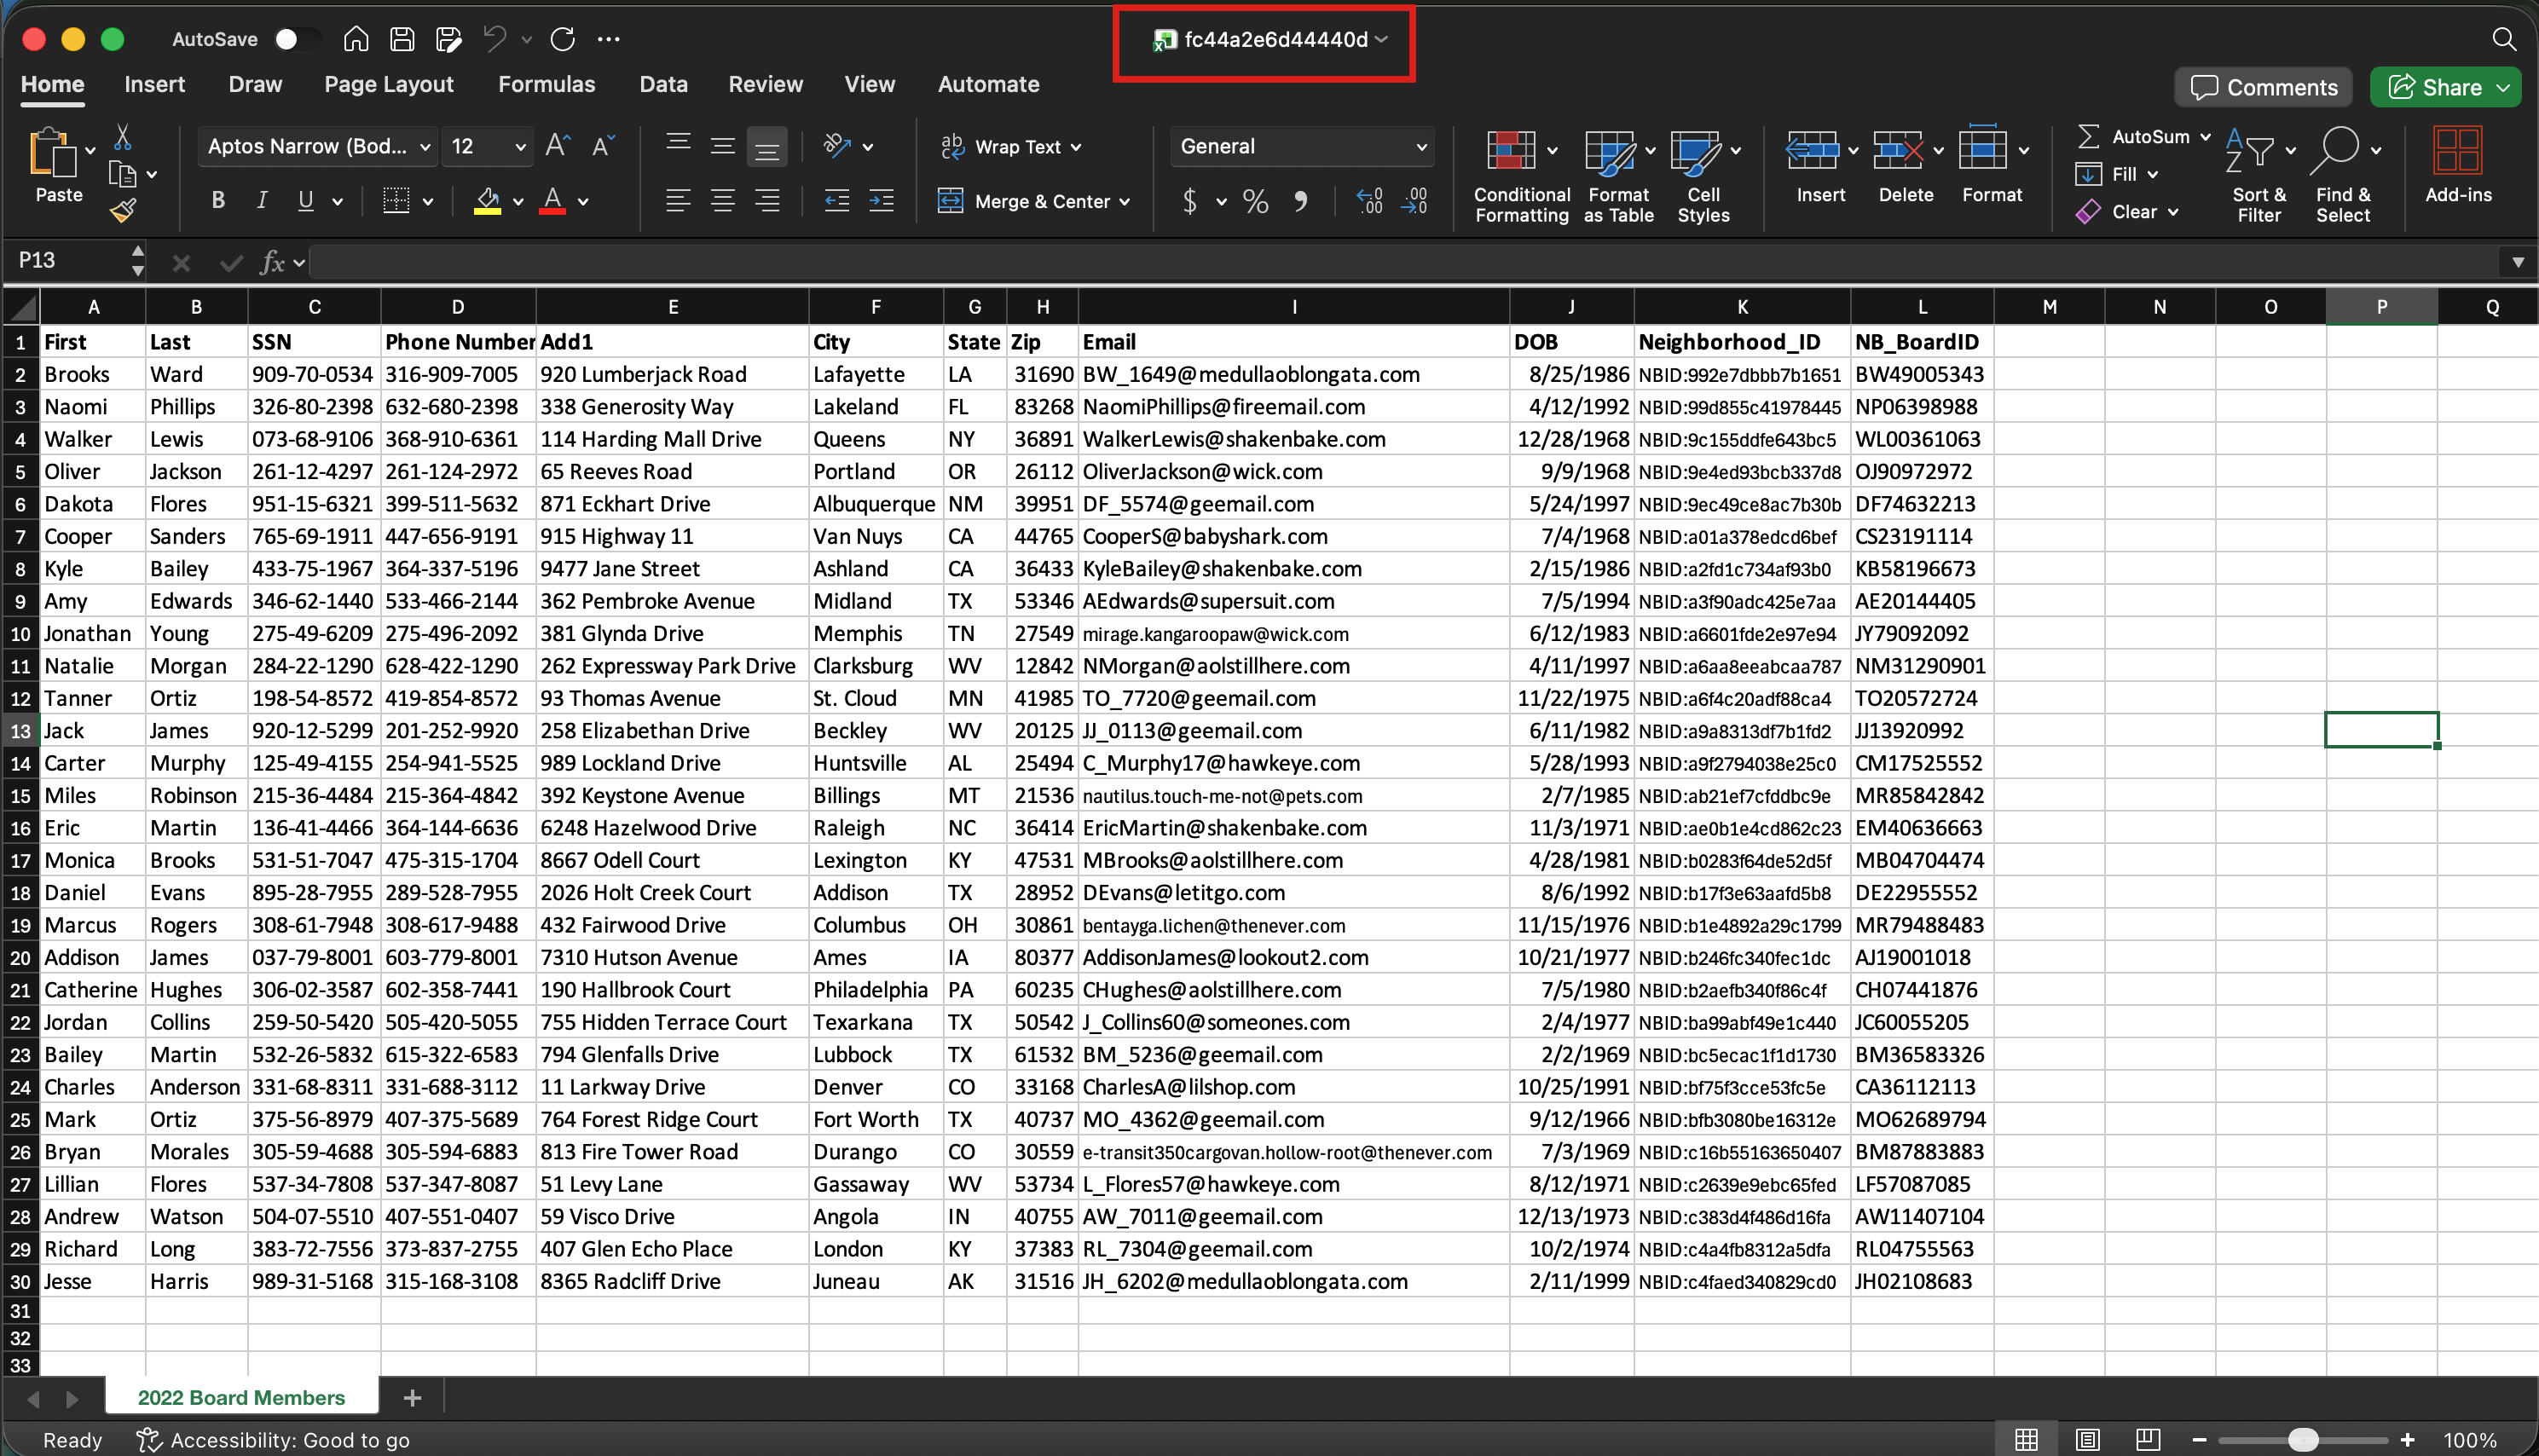 |
| Document ID as Mapped Column | Filename can be anything | Must include a Document ID column containing the target Canopy IDs for each row. |  |
Once you have prepared your spreadsheets according to the requirements, follow these steps to execute the Bulk Mapping process:
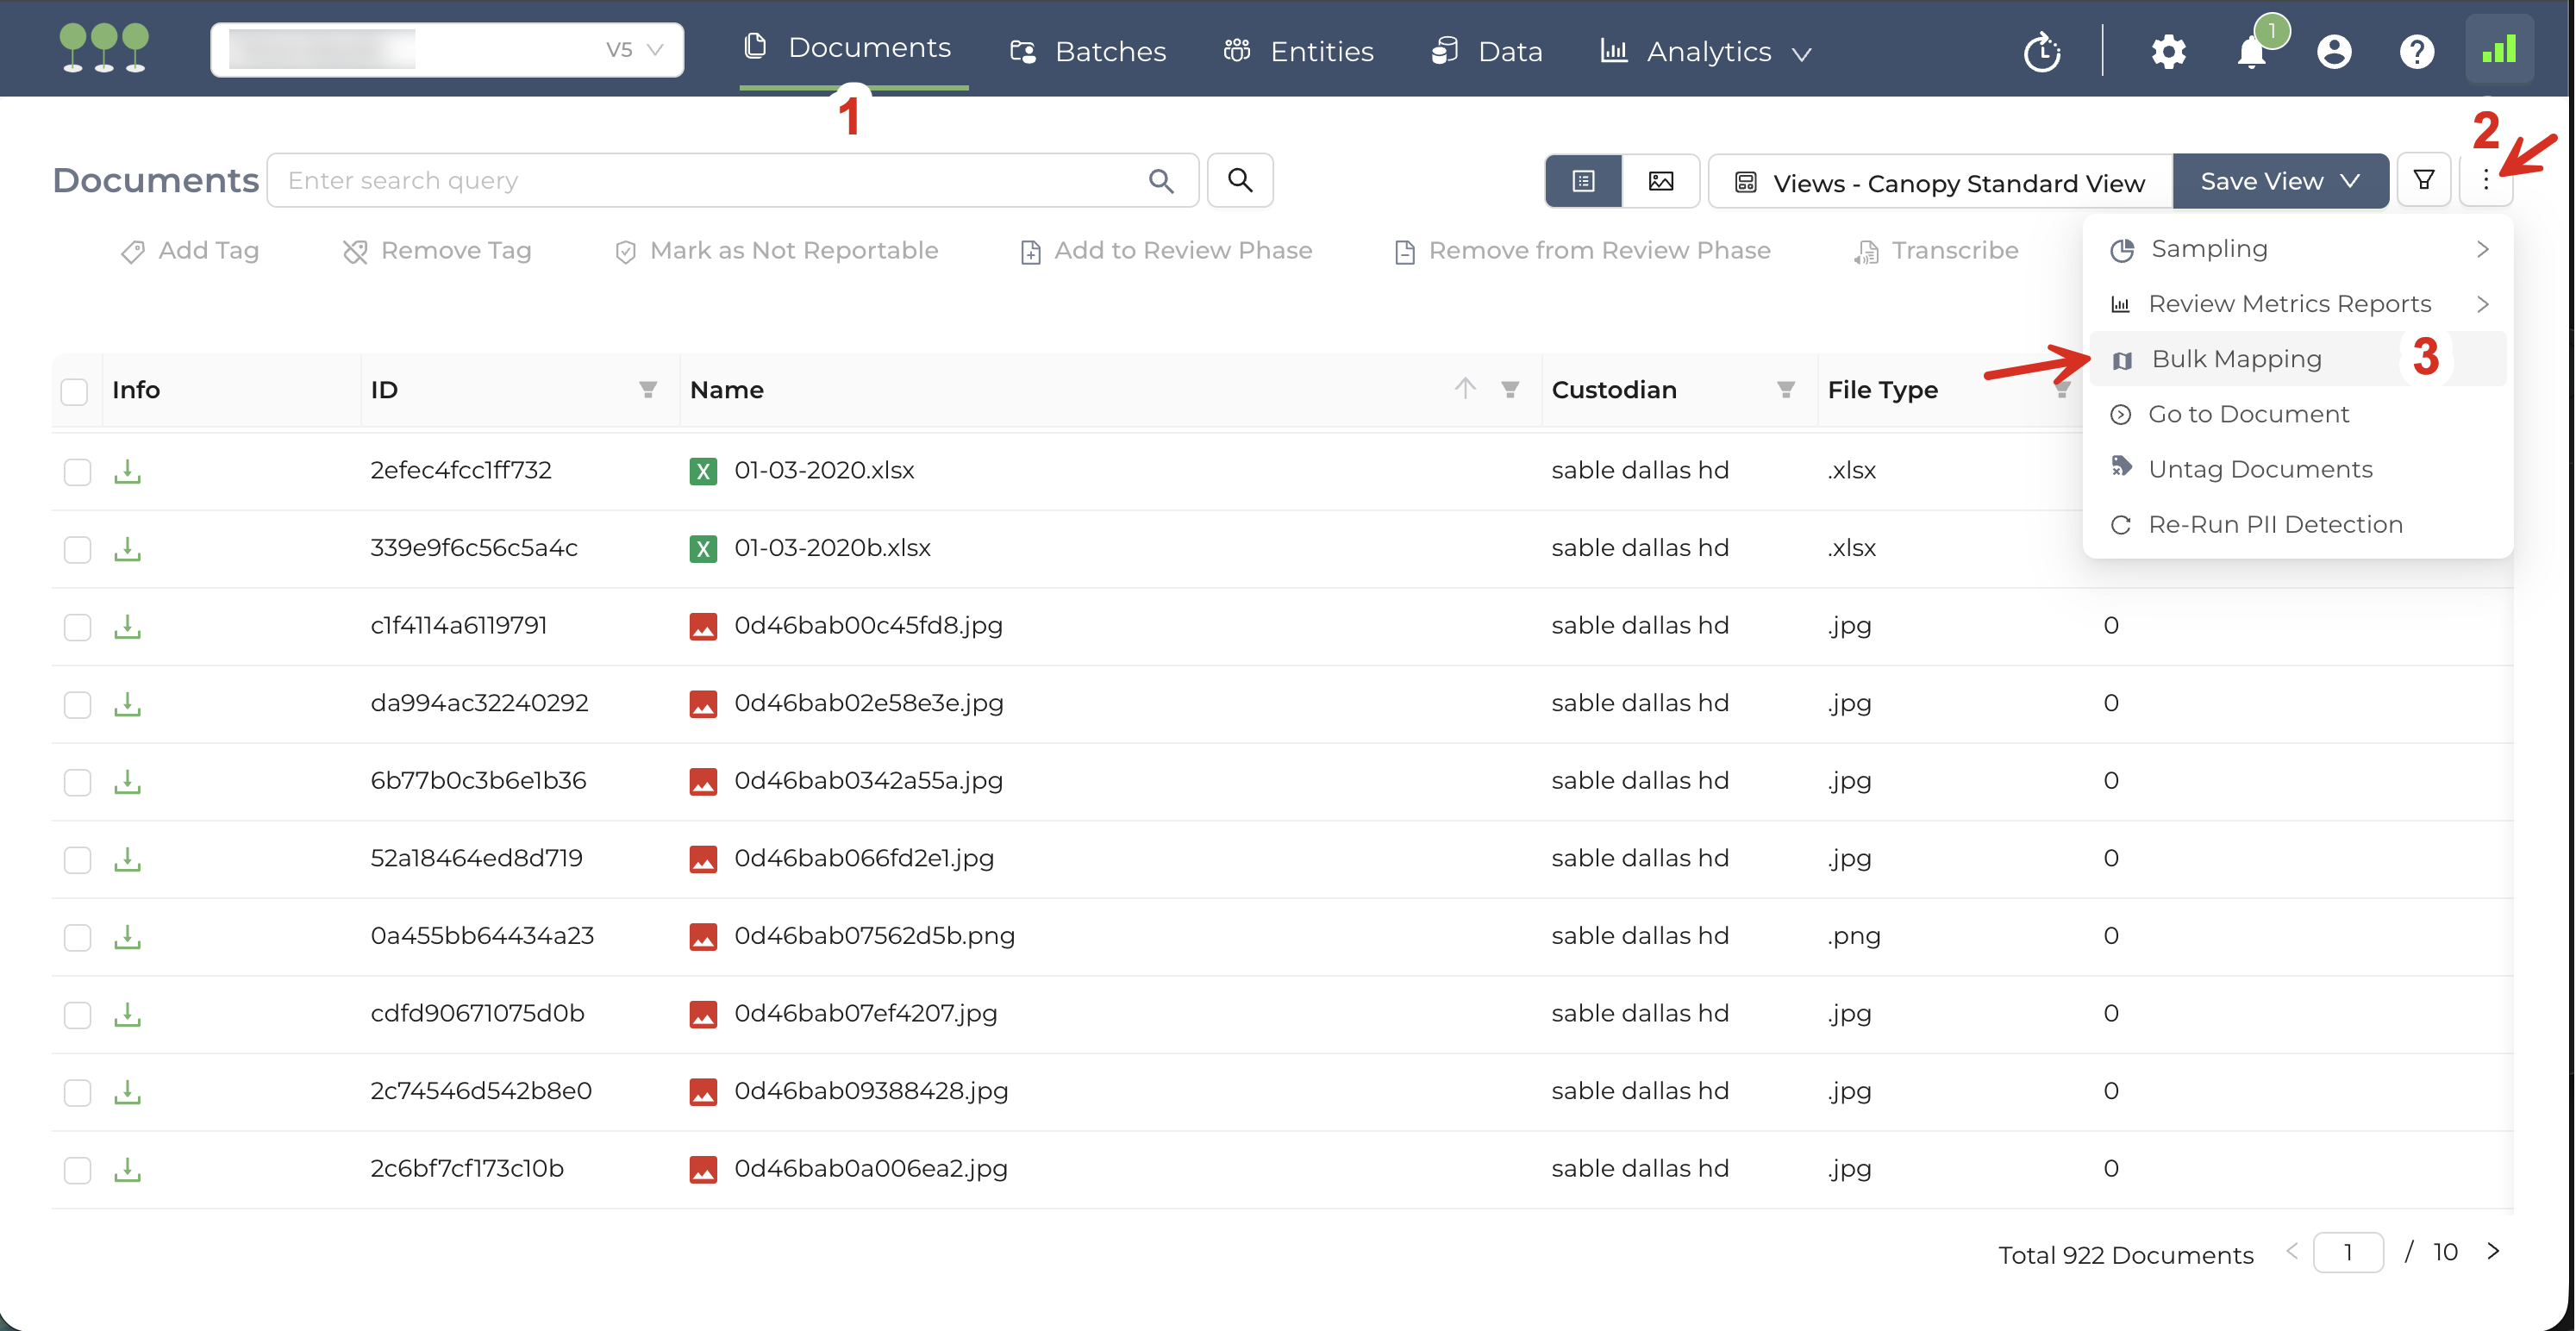
Navigate to the Documents page.
Click the Kebab Menu in the top-right corner.
Select Bulk Mapping from the dropdown menu.
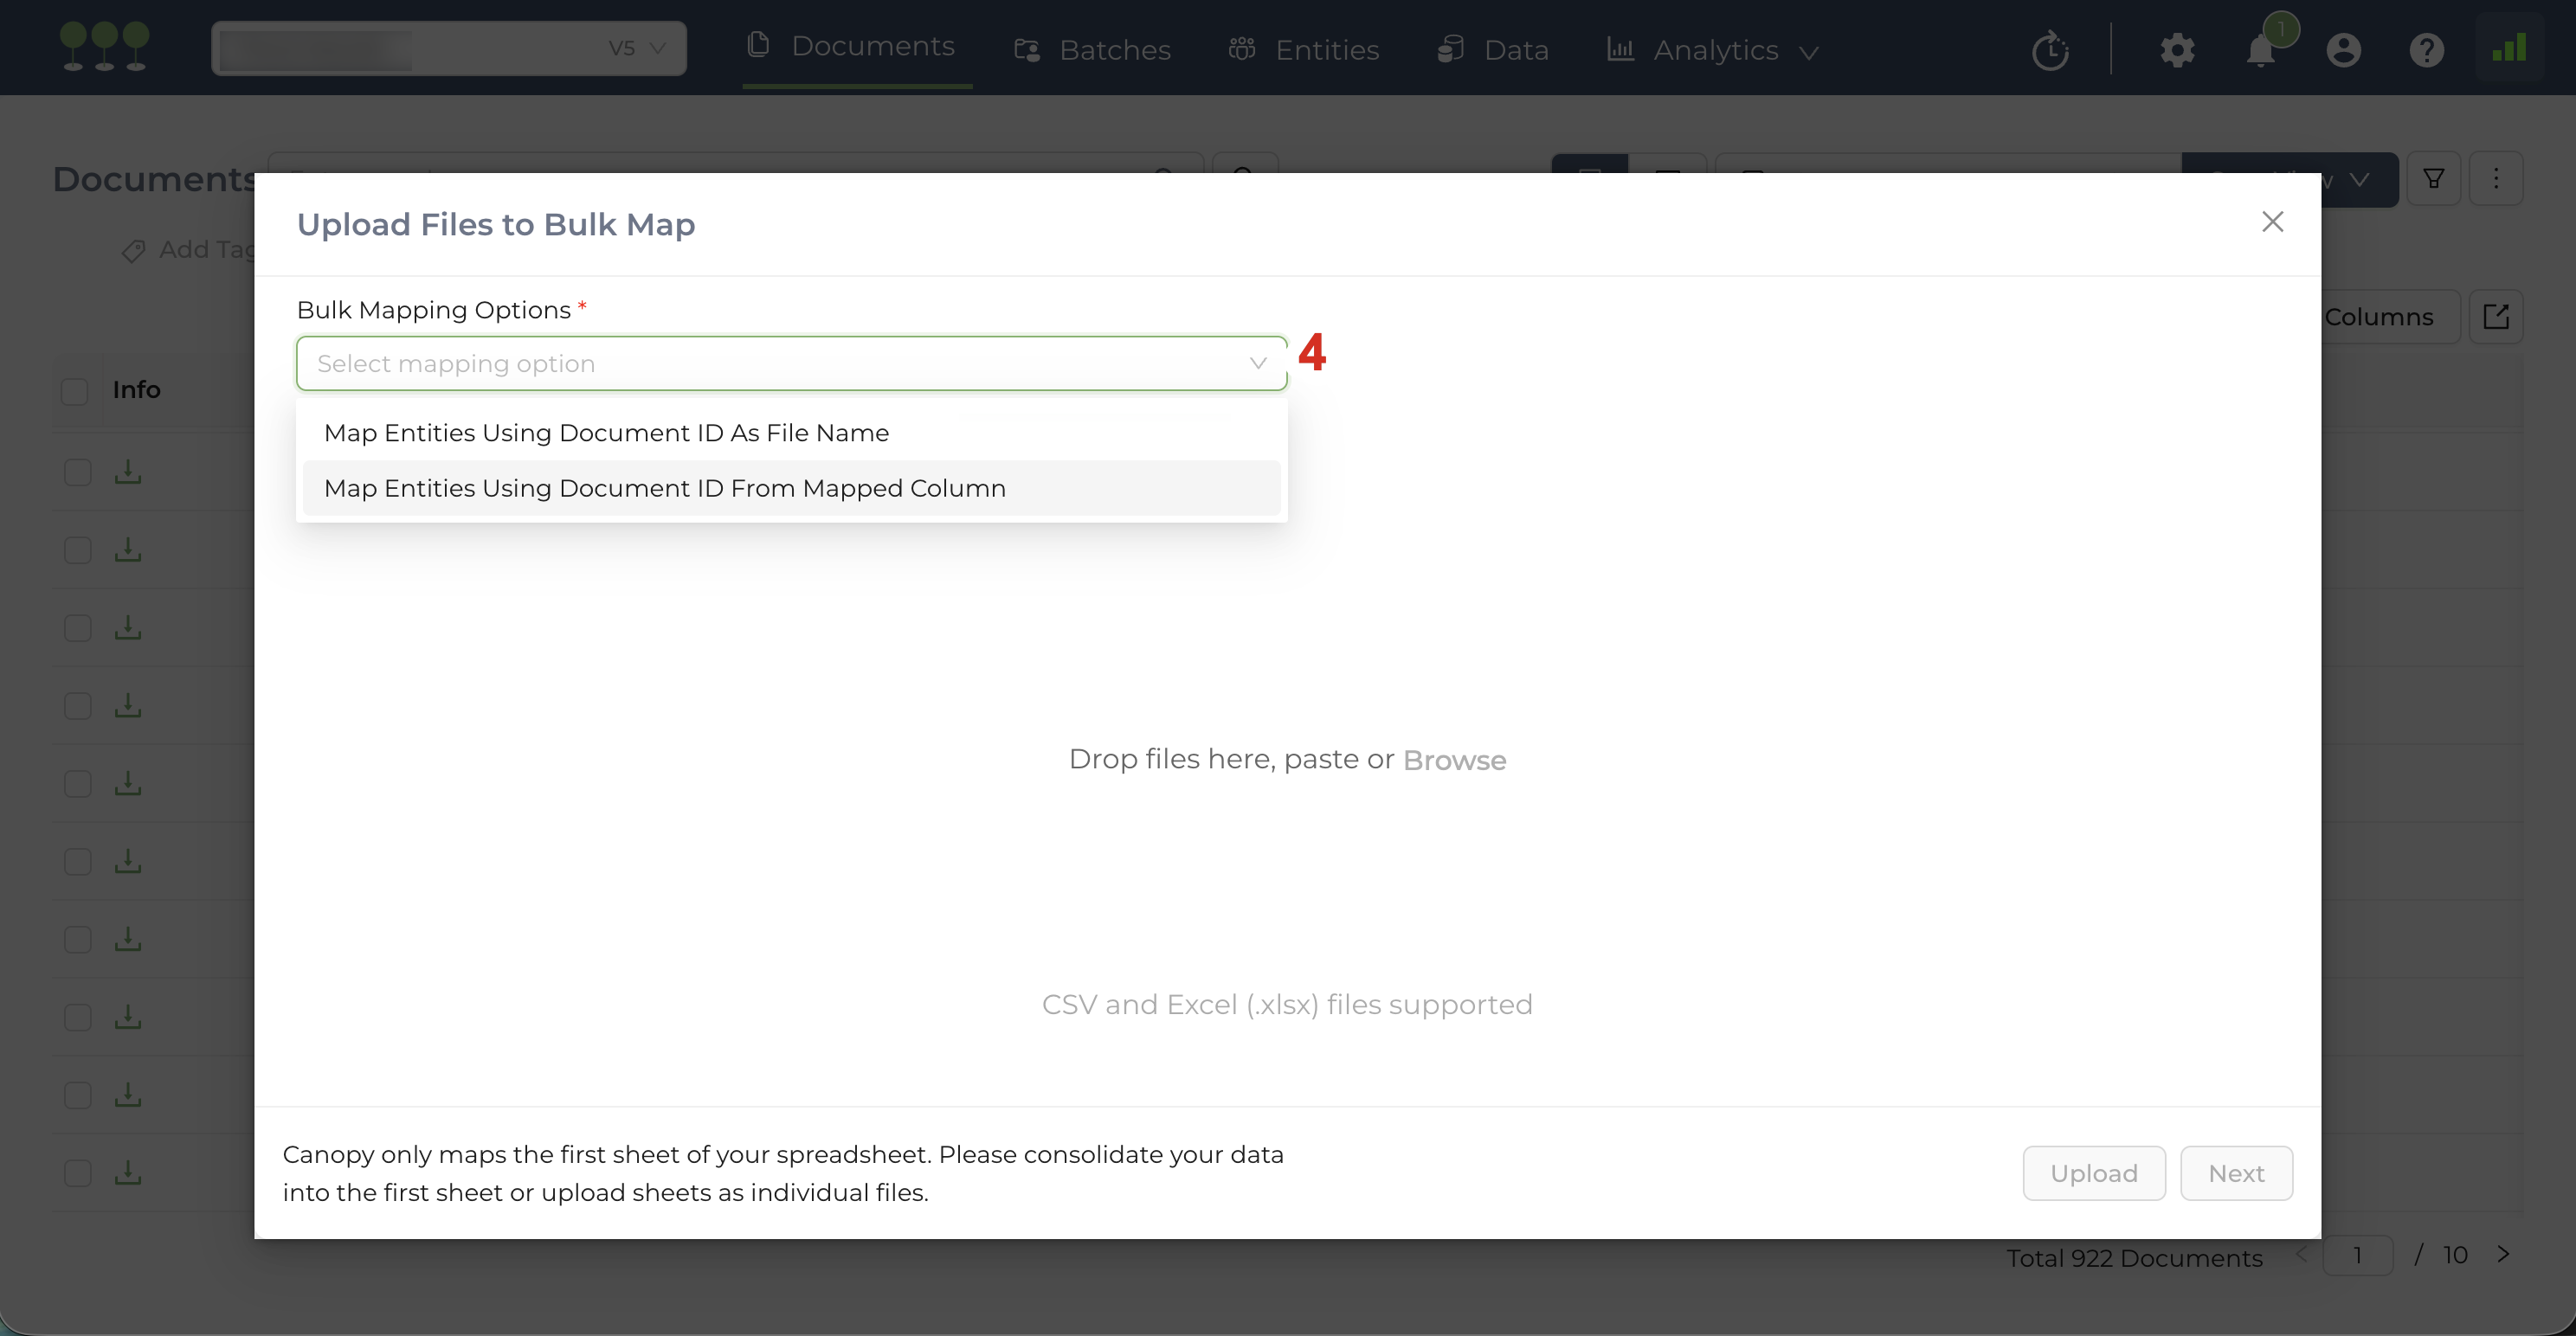
On the Upload Page, select your preferred mapping method:
- Map Entities using Document ID as File Name
- Map Entities using Document ID from Mapped Column
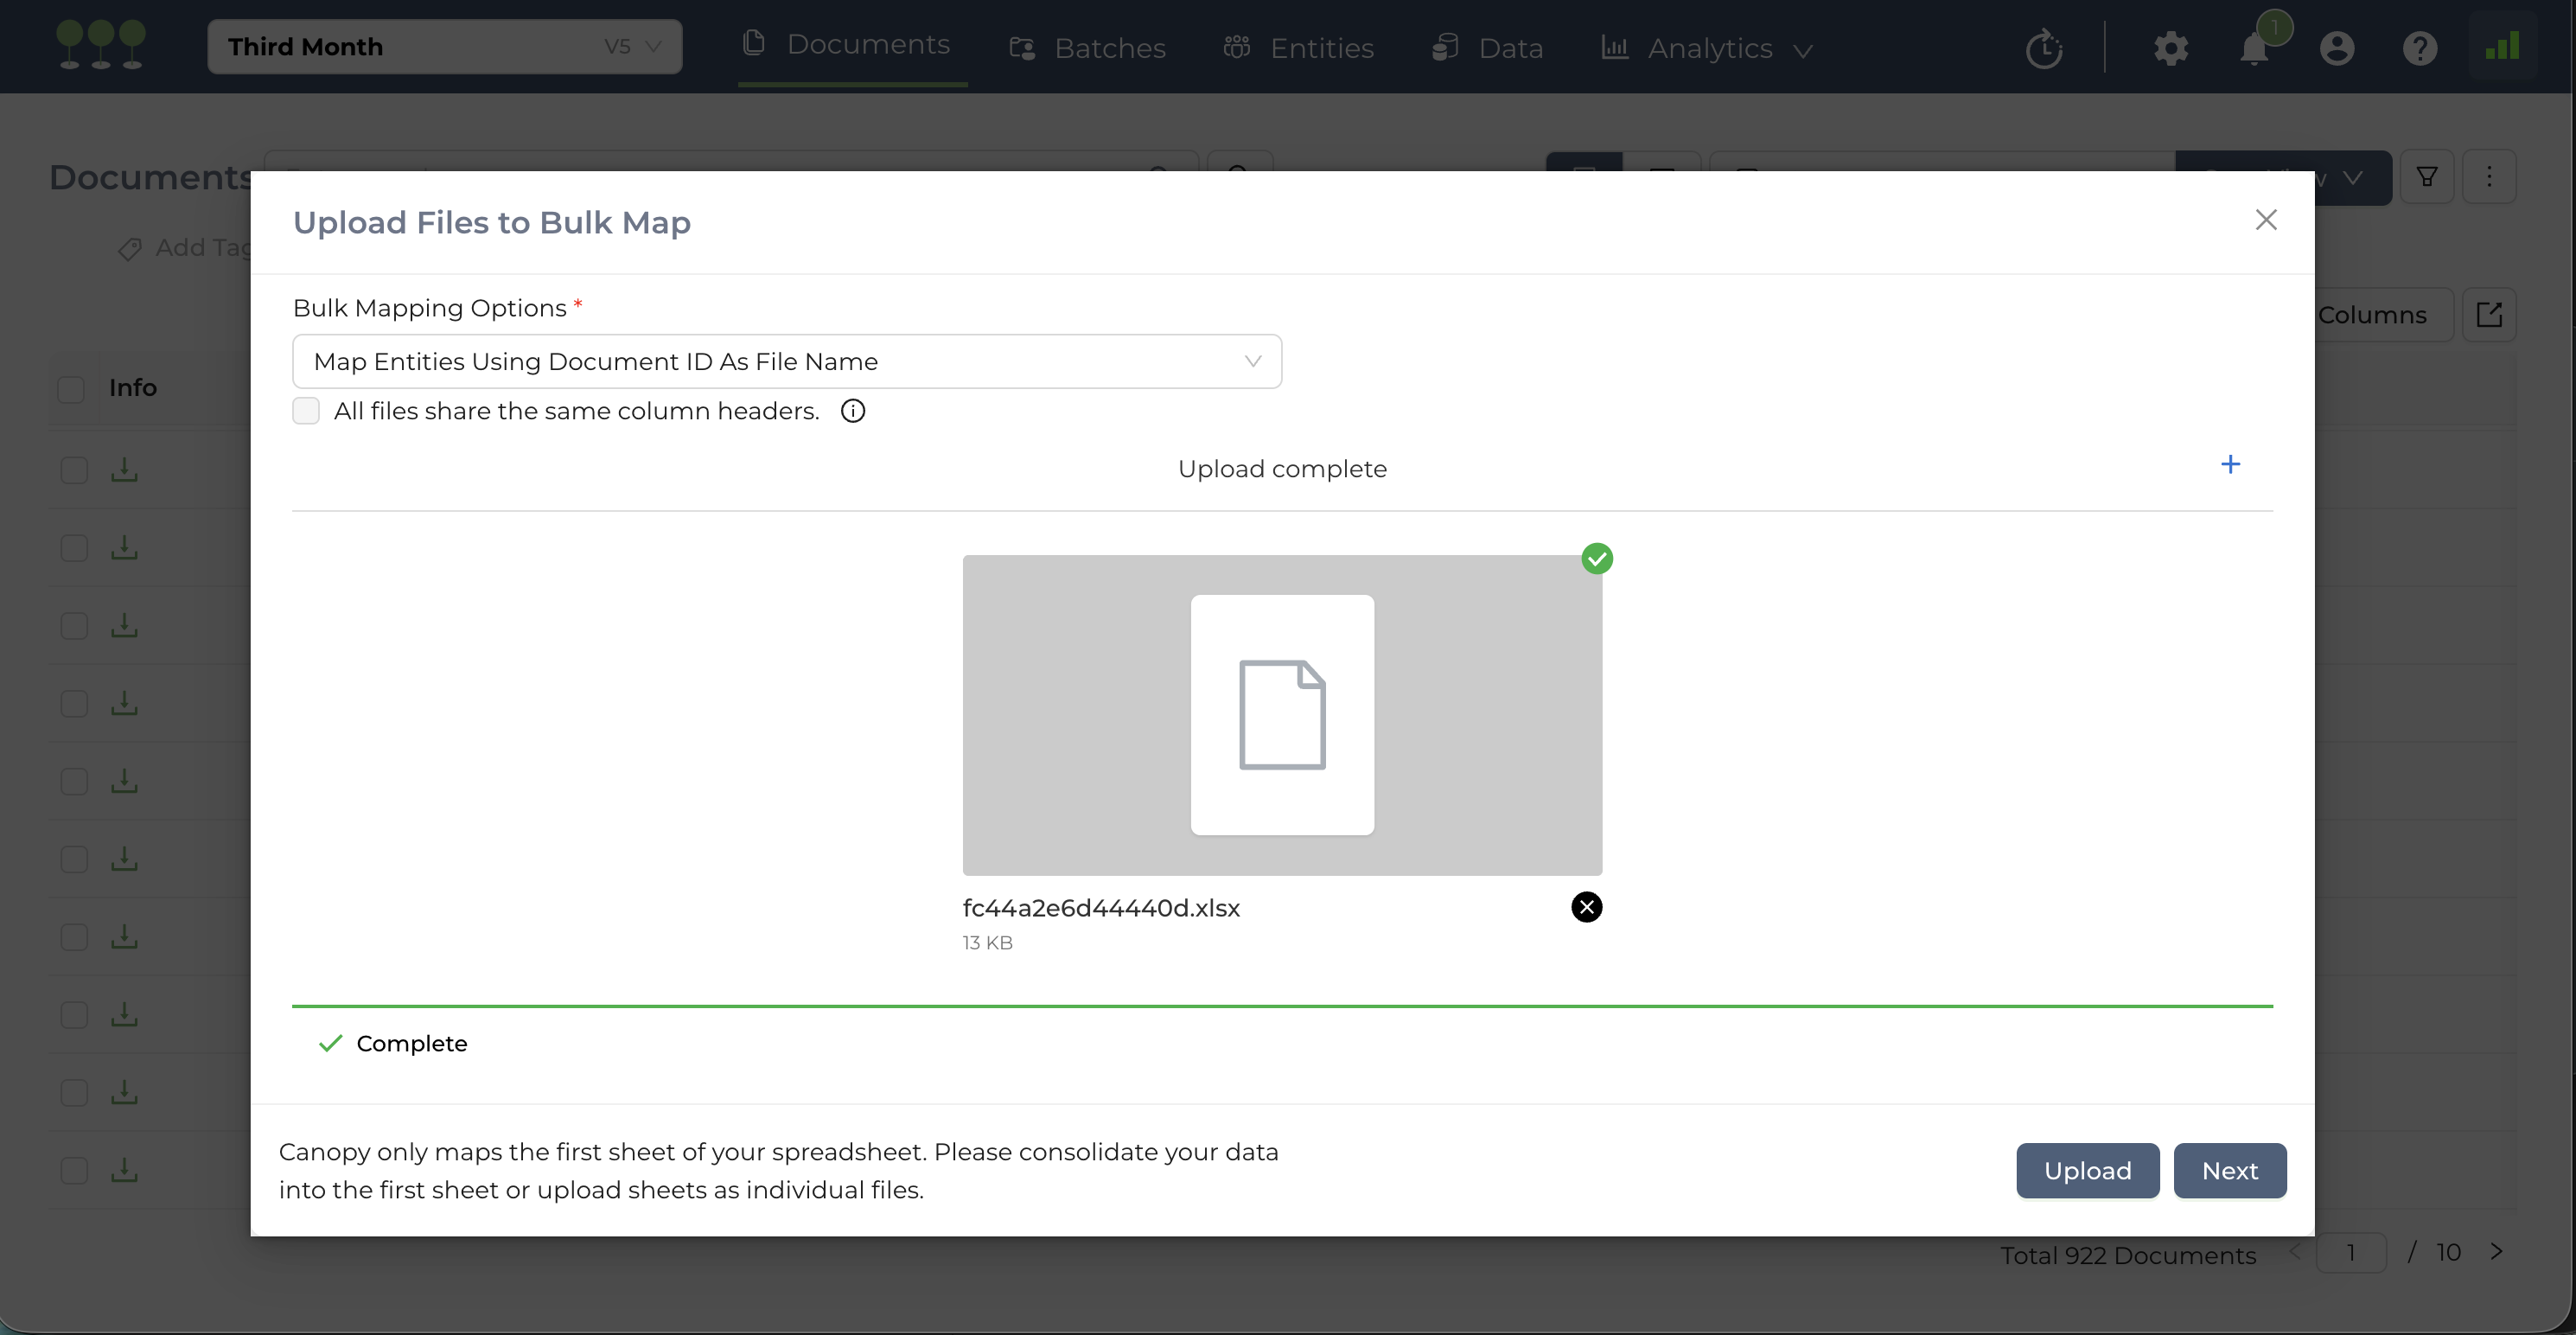
All files share the same column headers
- If all your uploaded spreadsheets have the exact same fields in row one, check this box. This means the system will map only the column headers from one spreadsheet and apply those settings to every file in the upload.
- If your uploaded spreadsheets have different column headers, do not check this box. This instructs the system to map unique column headers from across all the uploaded files.
Drag and drop your files or browse to upload.
(Optional) After a successful upload, users can click on the (+) sign to upload more spreadsheets if needed before the mapping process.
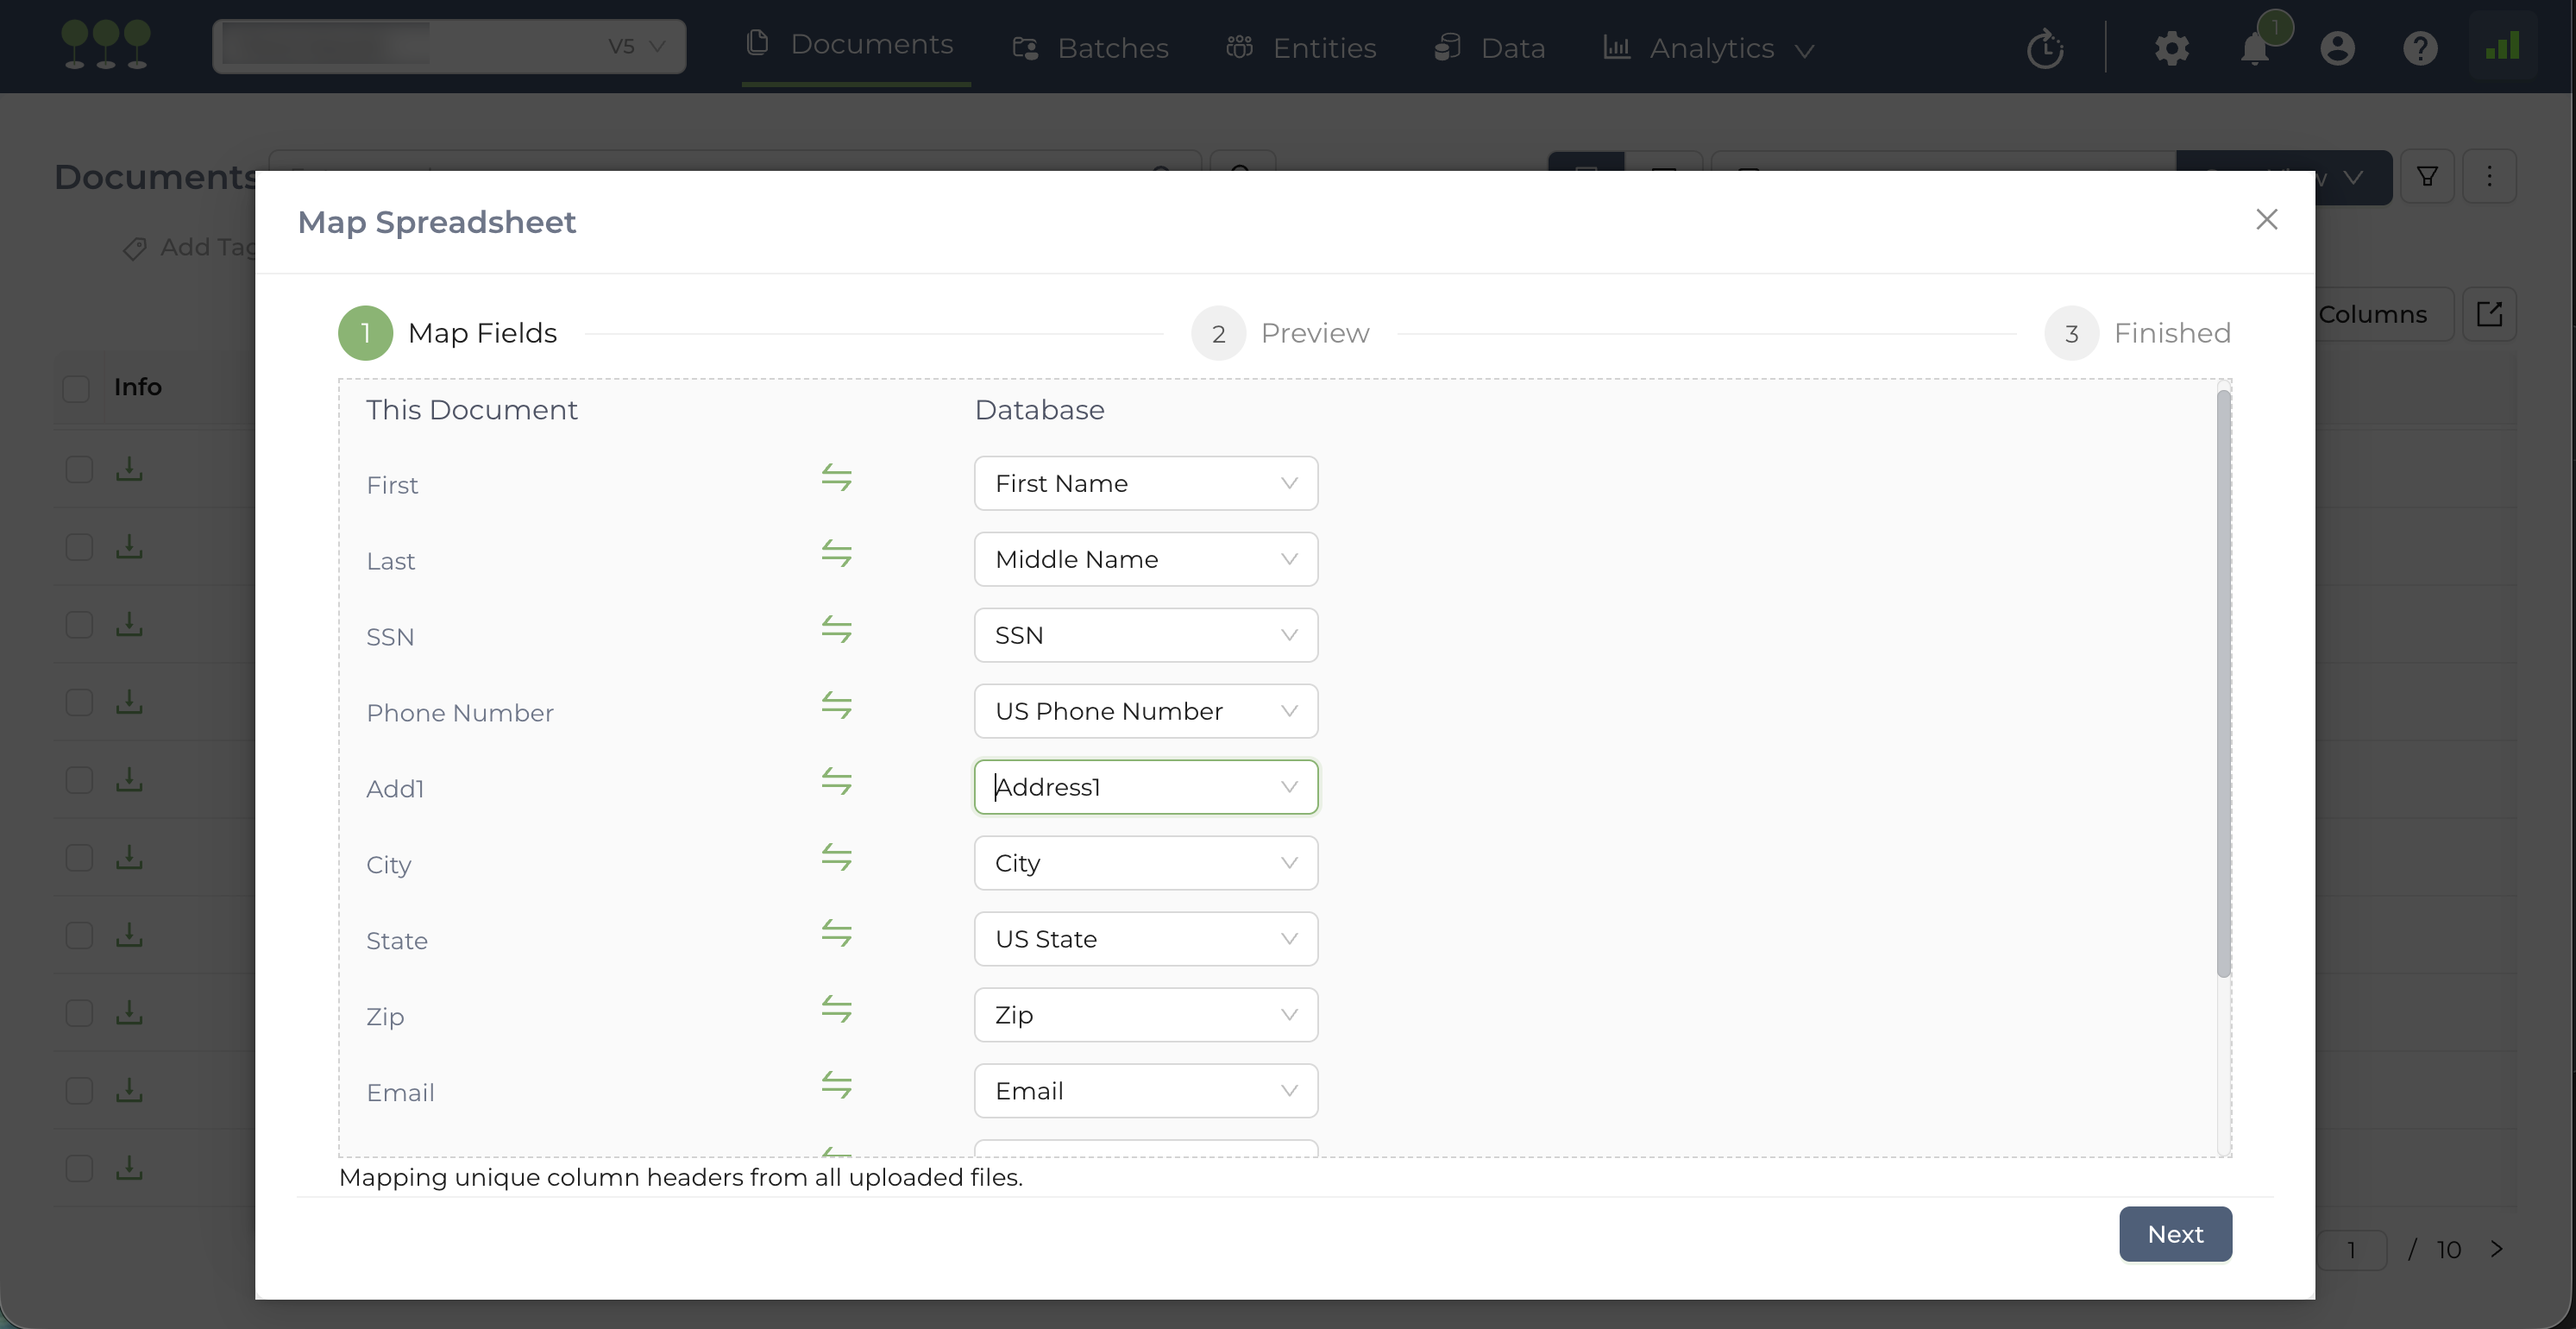
After a successful upload, the system will move to the Field Mapping step.
- Map: Match the column headers from your spreadsheet with the corresponding Entity Fields in the Canopy database.
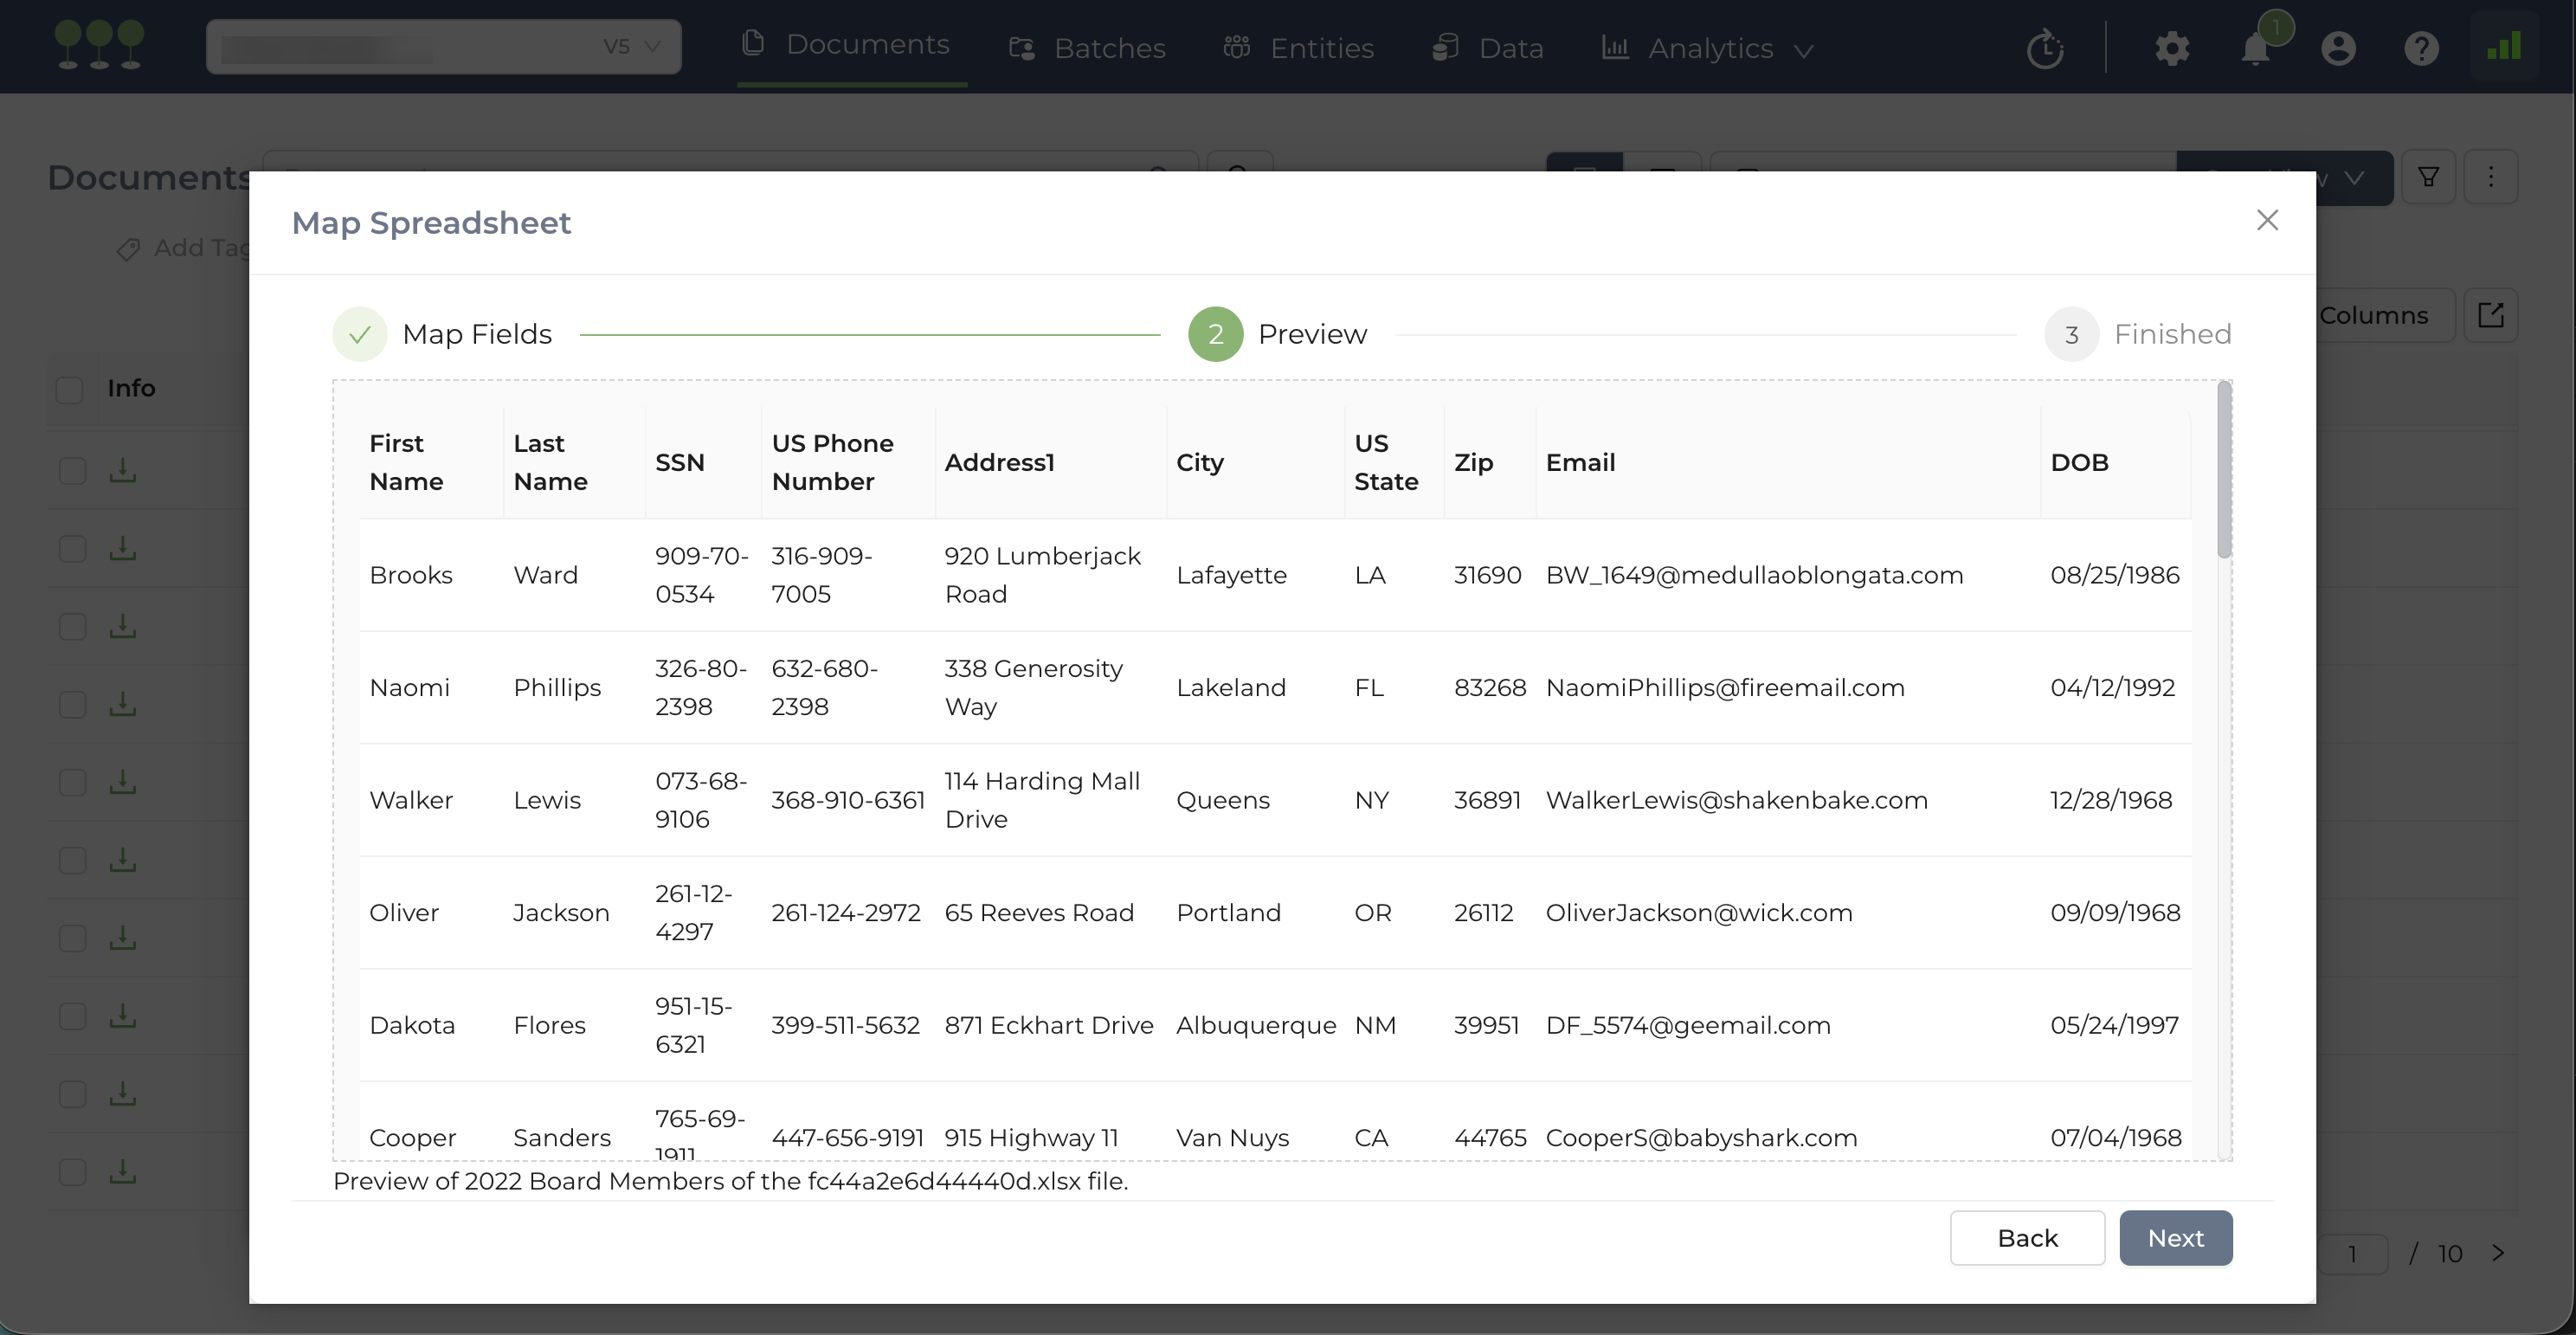
- Preview: Click Next to view a preview of your data. This allows you to verify that the mapping is correct based on a sample of your uploaded files.
- Launch: Click Finish to initiate the Bulk Mapping job.
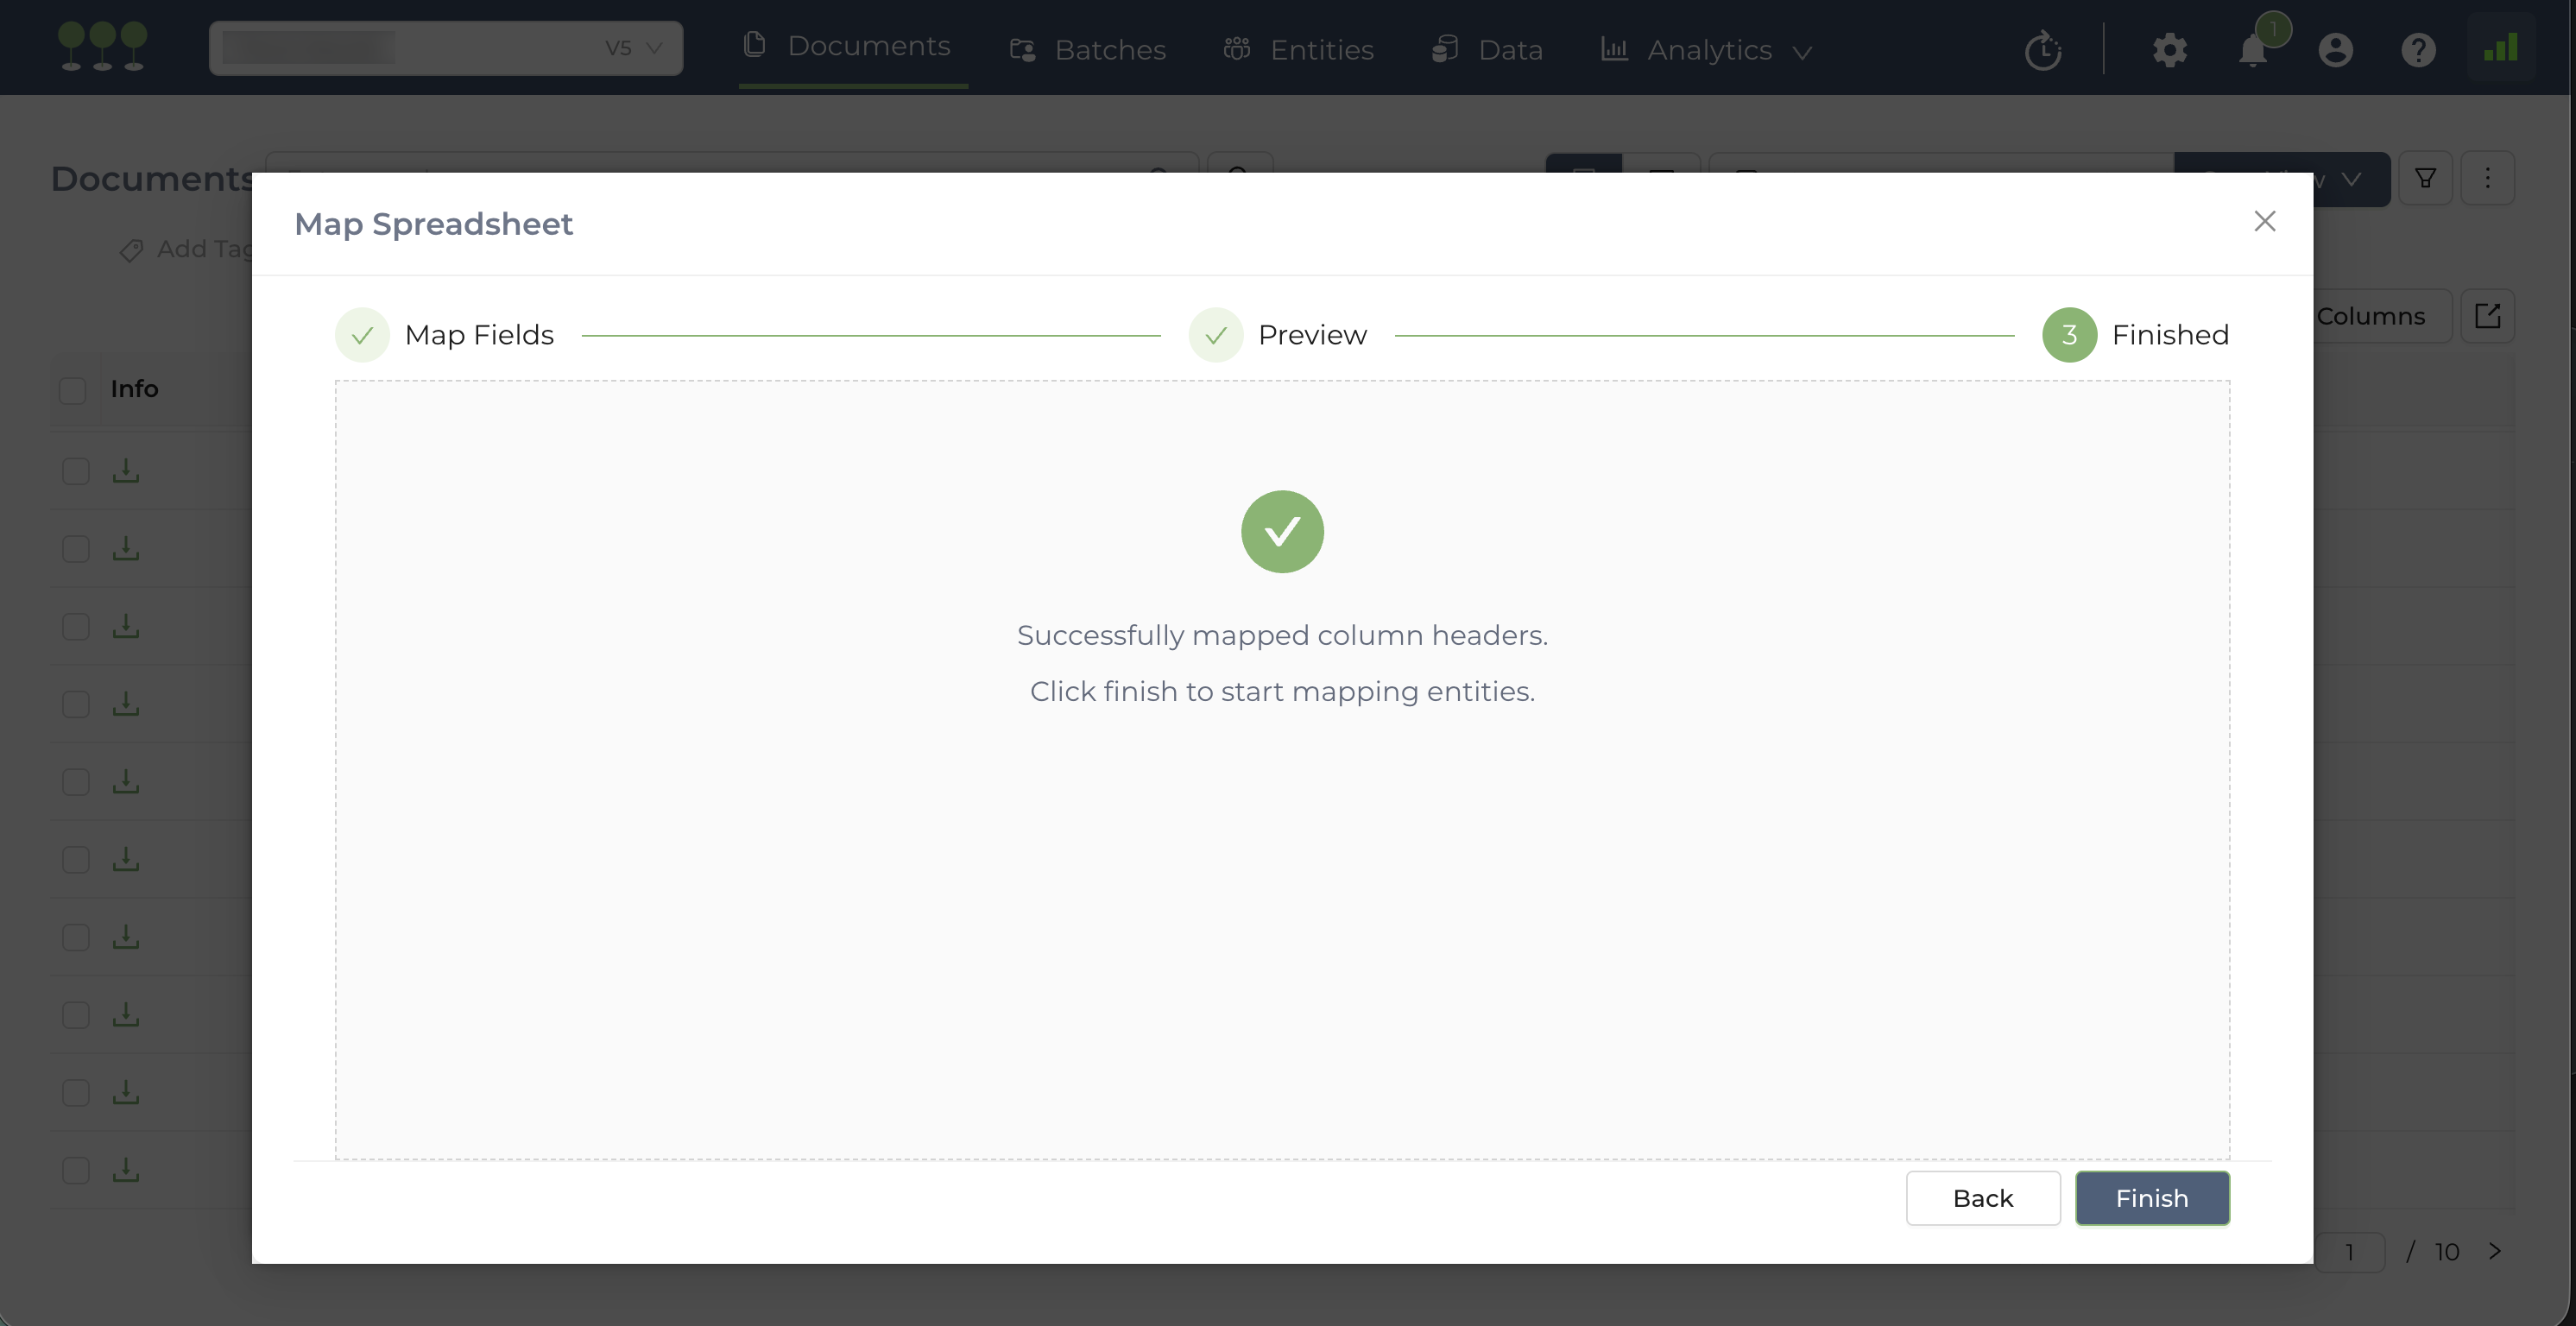
- The Bulk Mapping will begin as a background task. You will receive a system notification that the job has started.
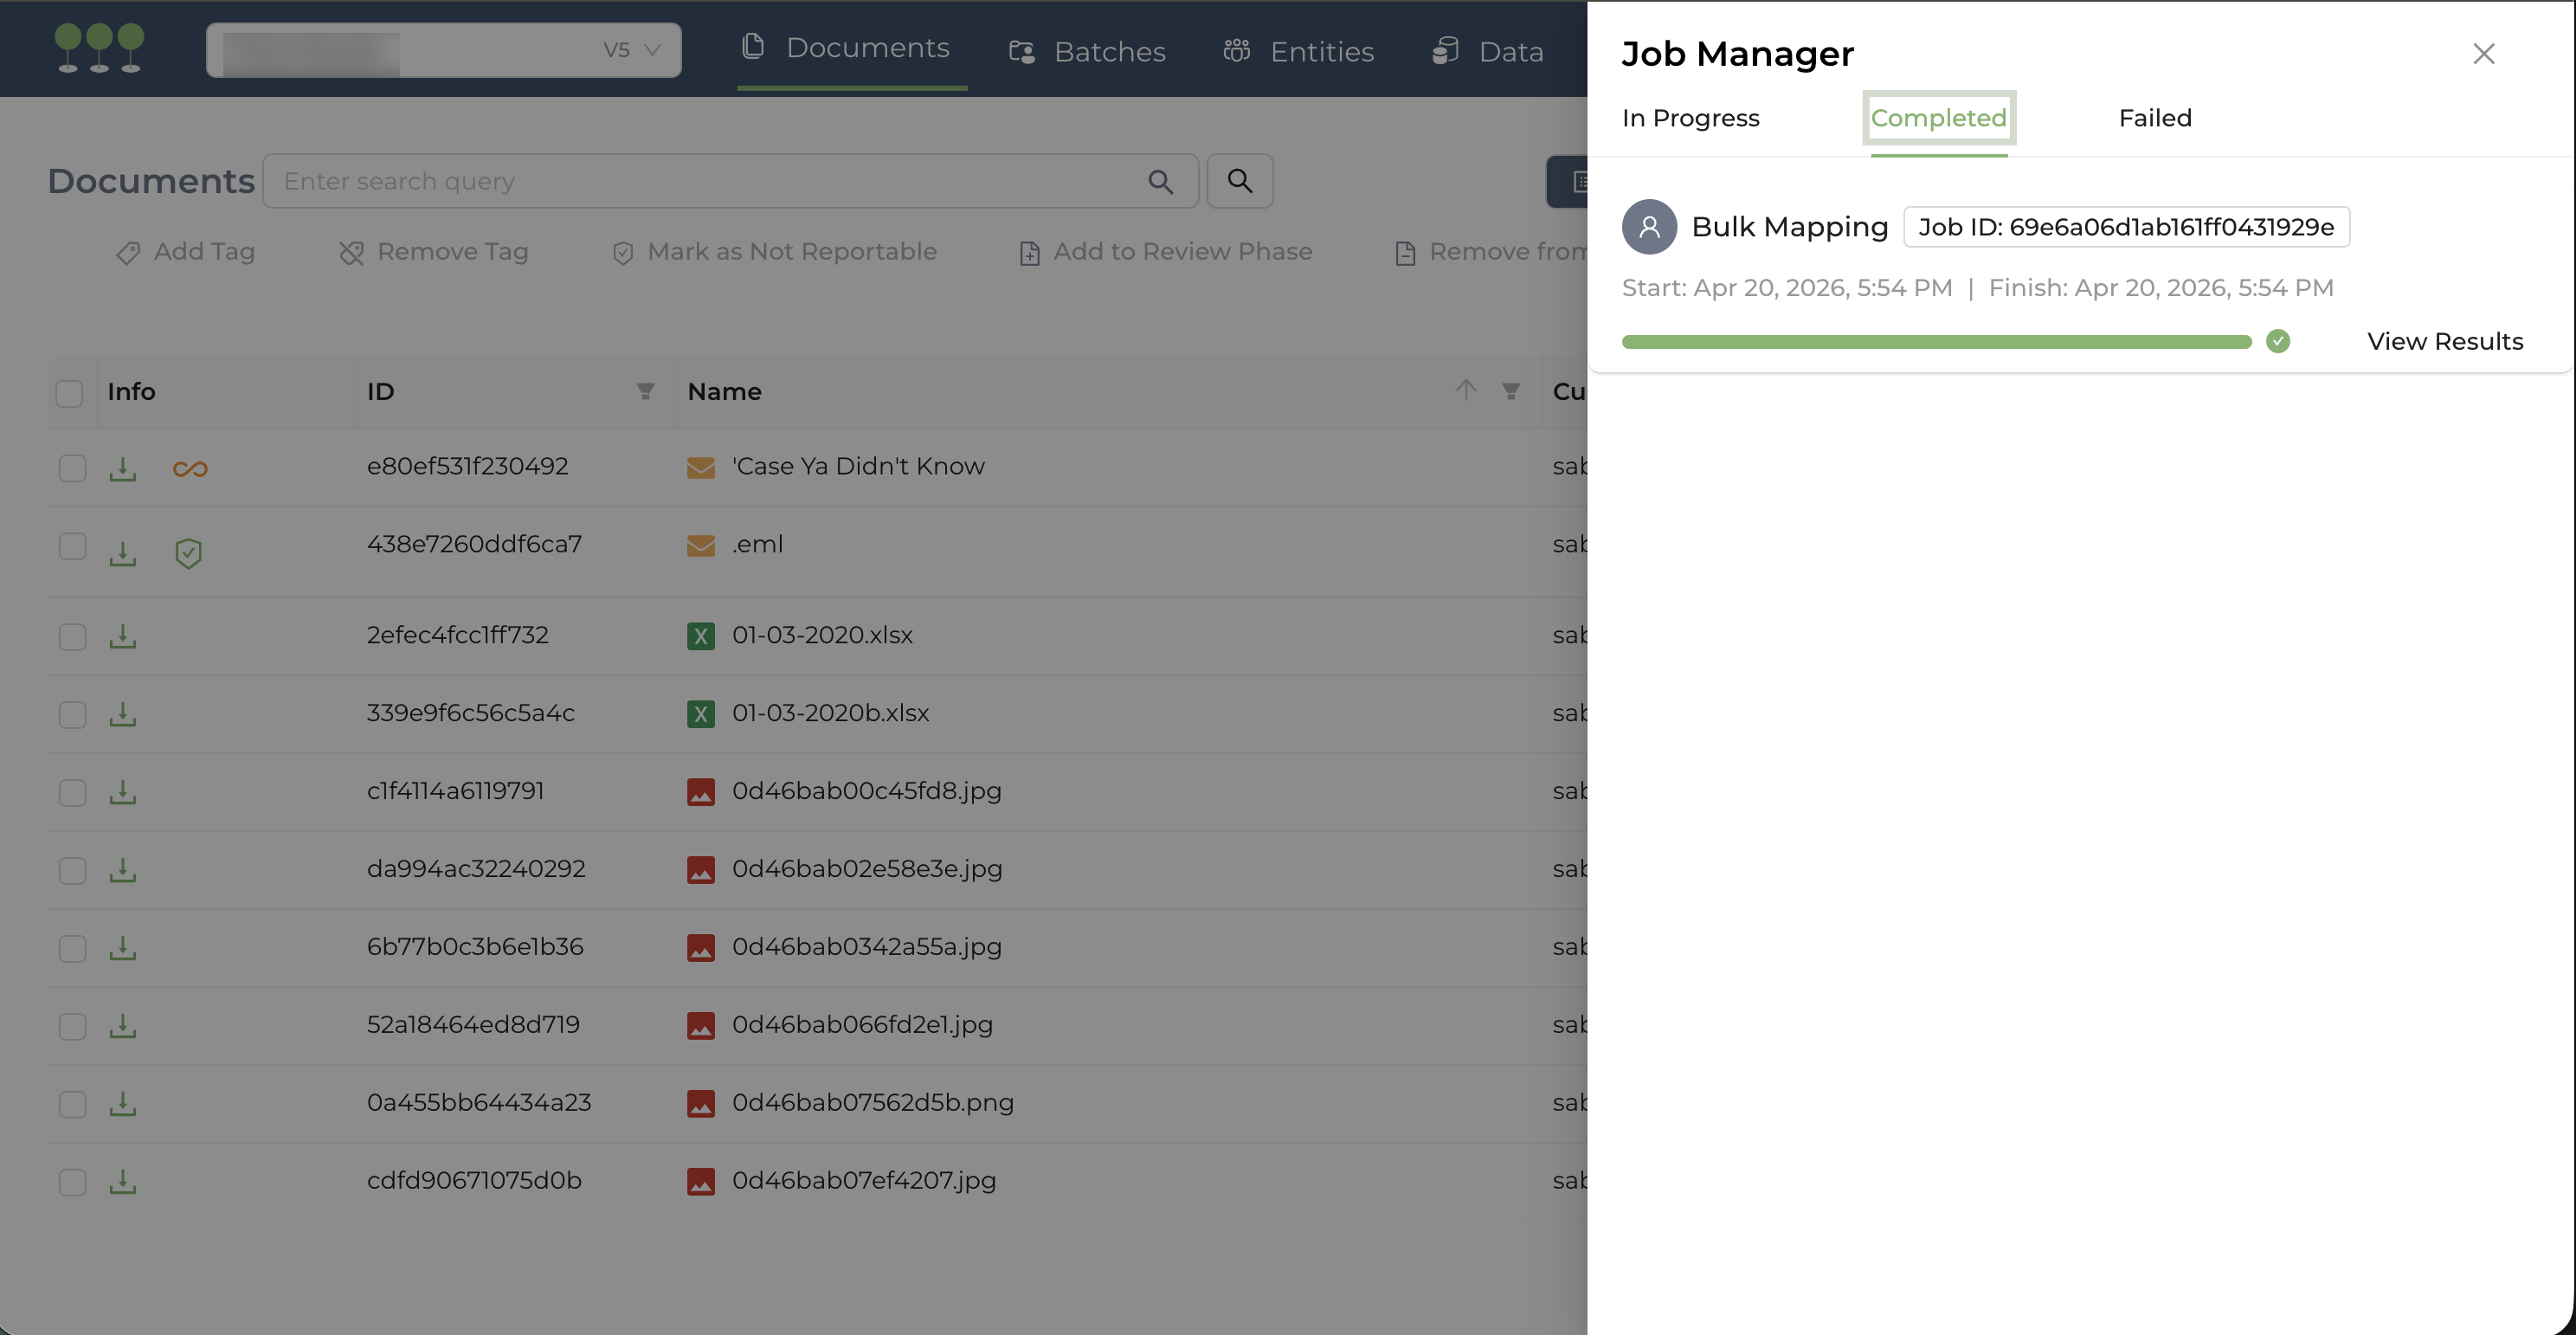
- Upon completion, you will receive a notification with two options:
- Clicking Activity History takes you to the Activity History page, where you can view details of the completed job.
- Clicking Document List takes you to the Documents page where the newly mapped documents are listed.
Canopy provides several intuitive methods for efficiently finding and working with files that have completed the Bulk Mapping process.
Completed Bulk Mapping jobs are accessible through the Job Manager under the Completed tab.
- Navigate to the Job Manager on the navigation bar.
- Click the Completed tab to view all completed jobs.
- Click the Job ID to access the detailed Activity History log,
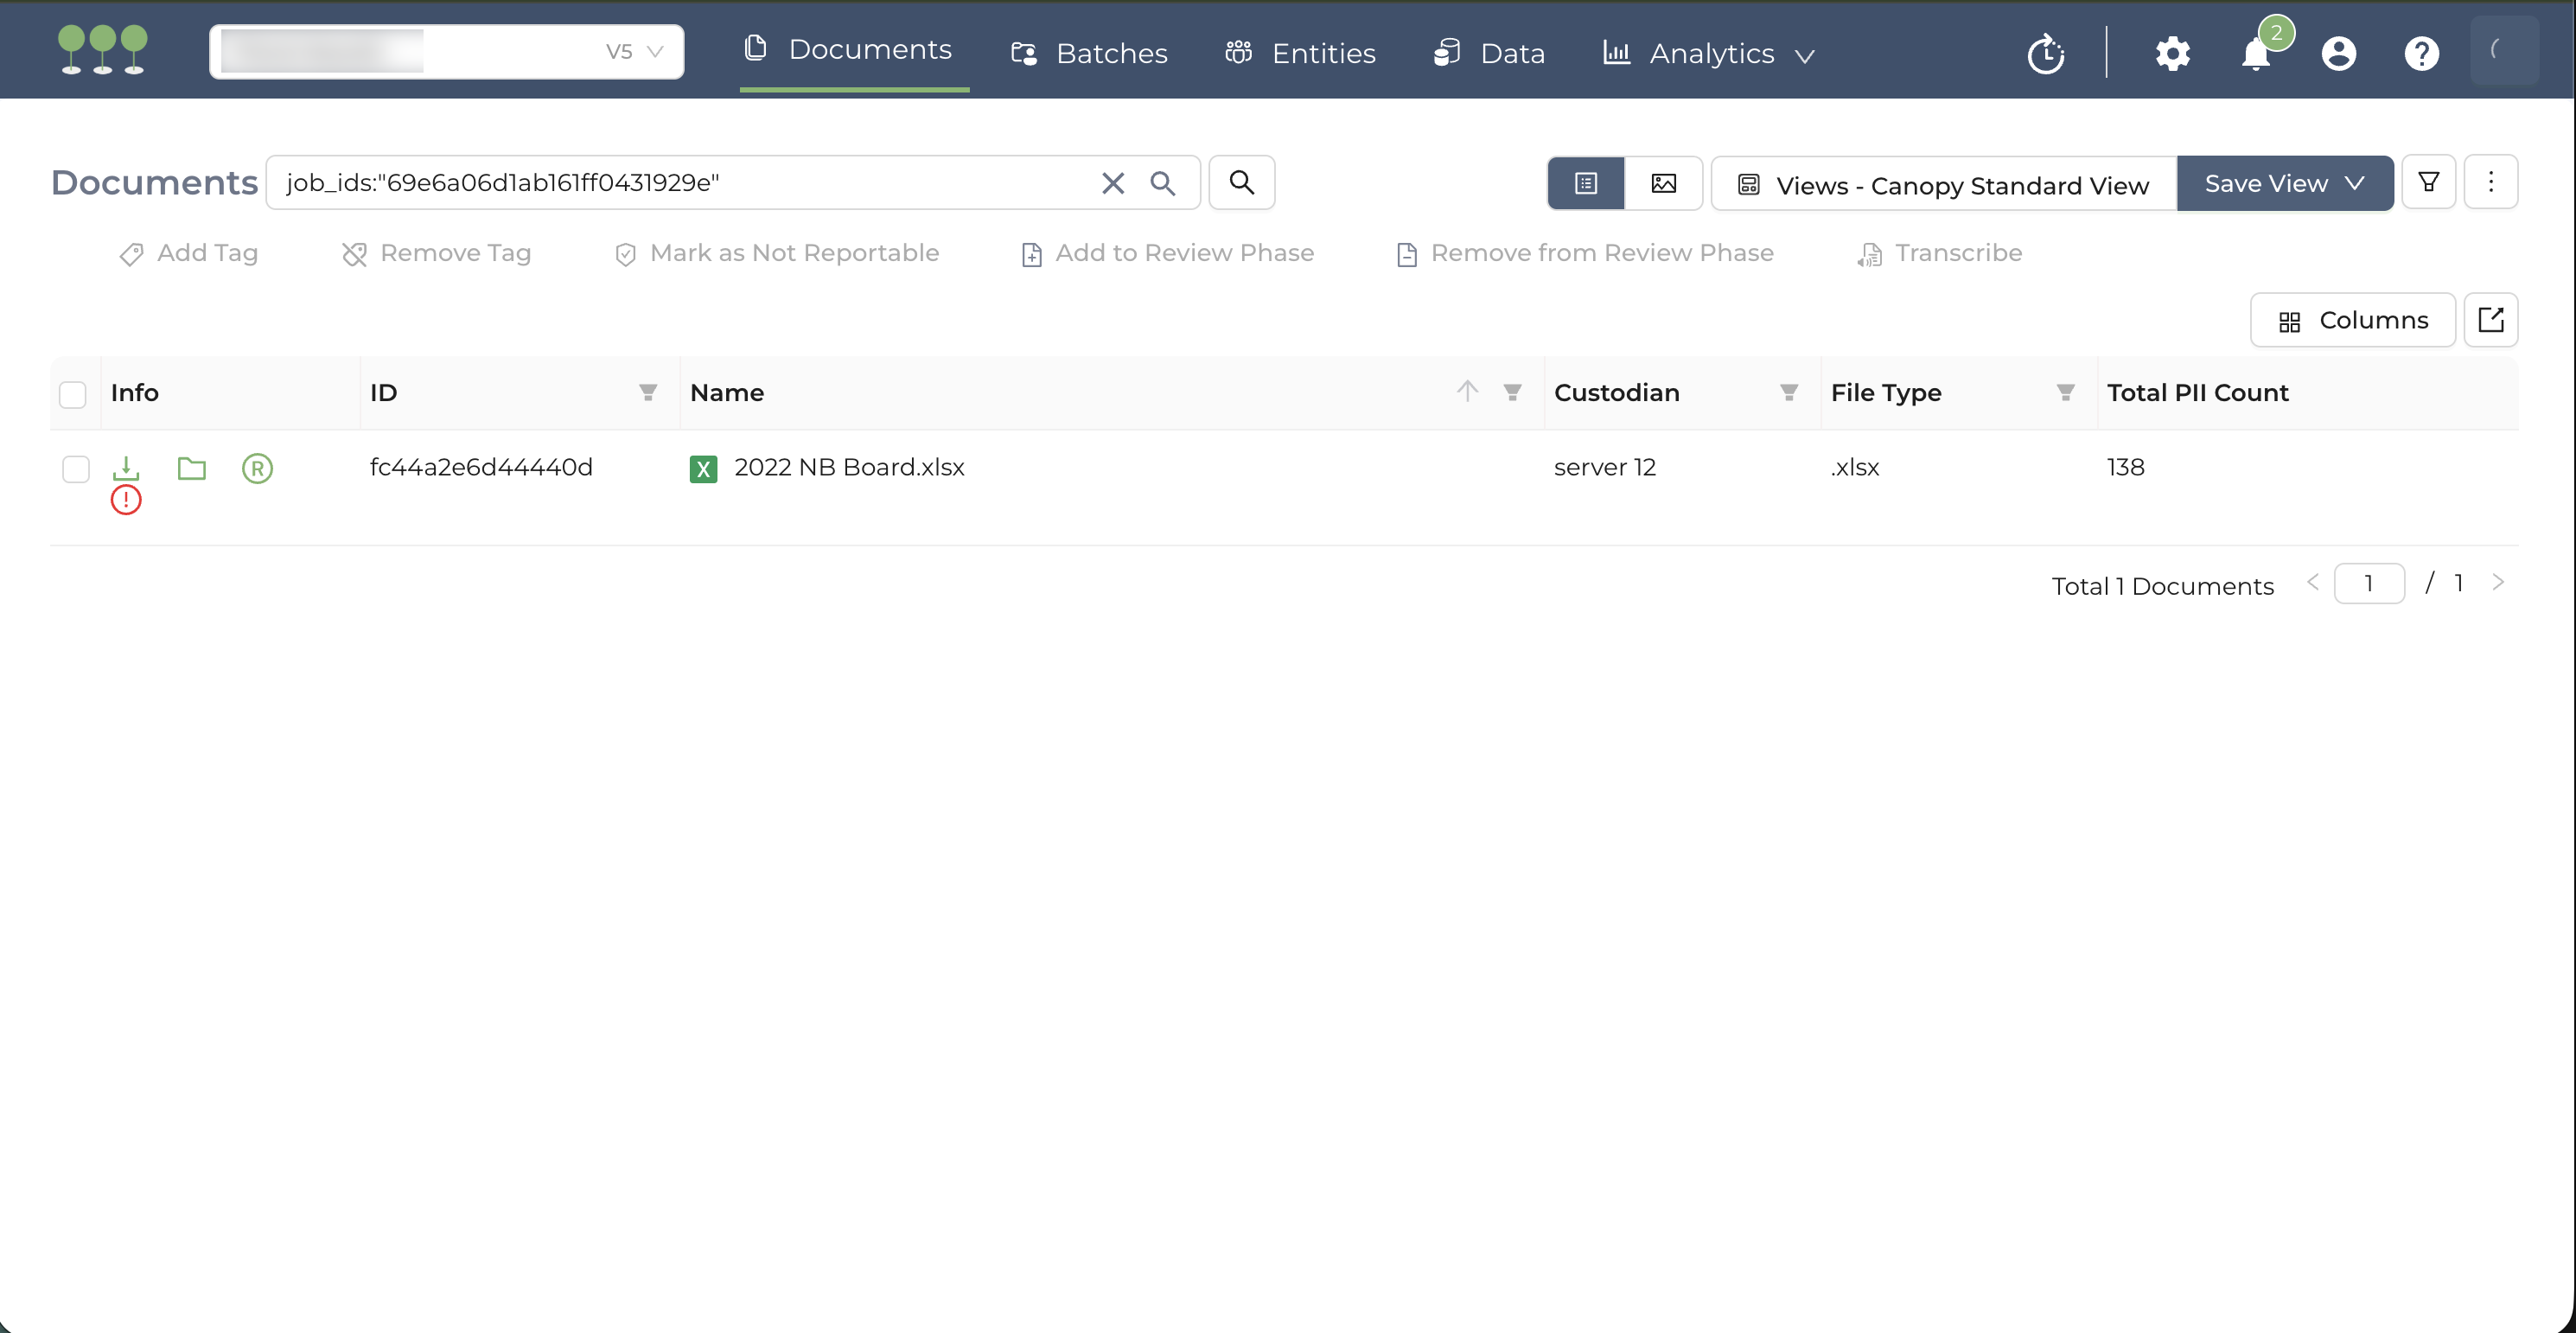
- Or click View Results to access the Documents page, filtered to show the job’s bulk-mapped documents.

Job entries in the Job Manager are automatically removed after 72 hours. Please review and access job results promptly.
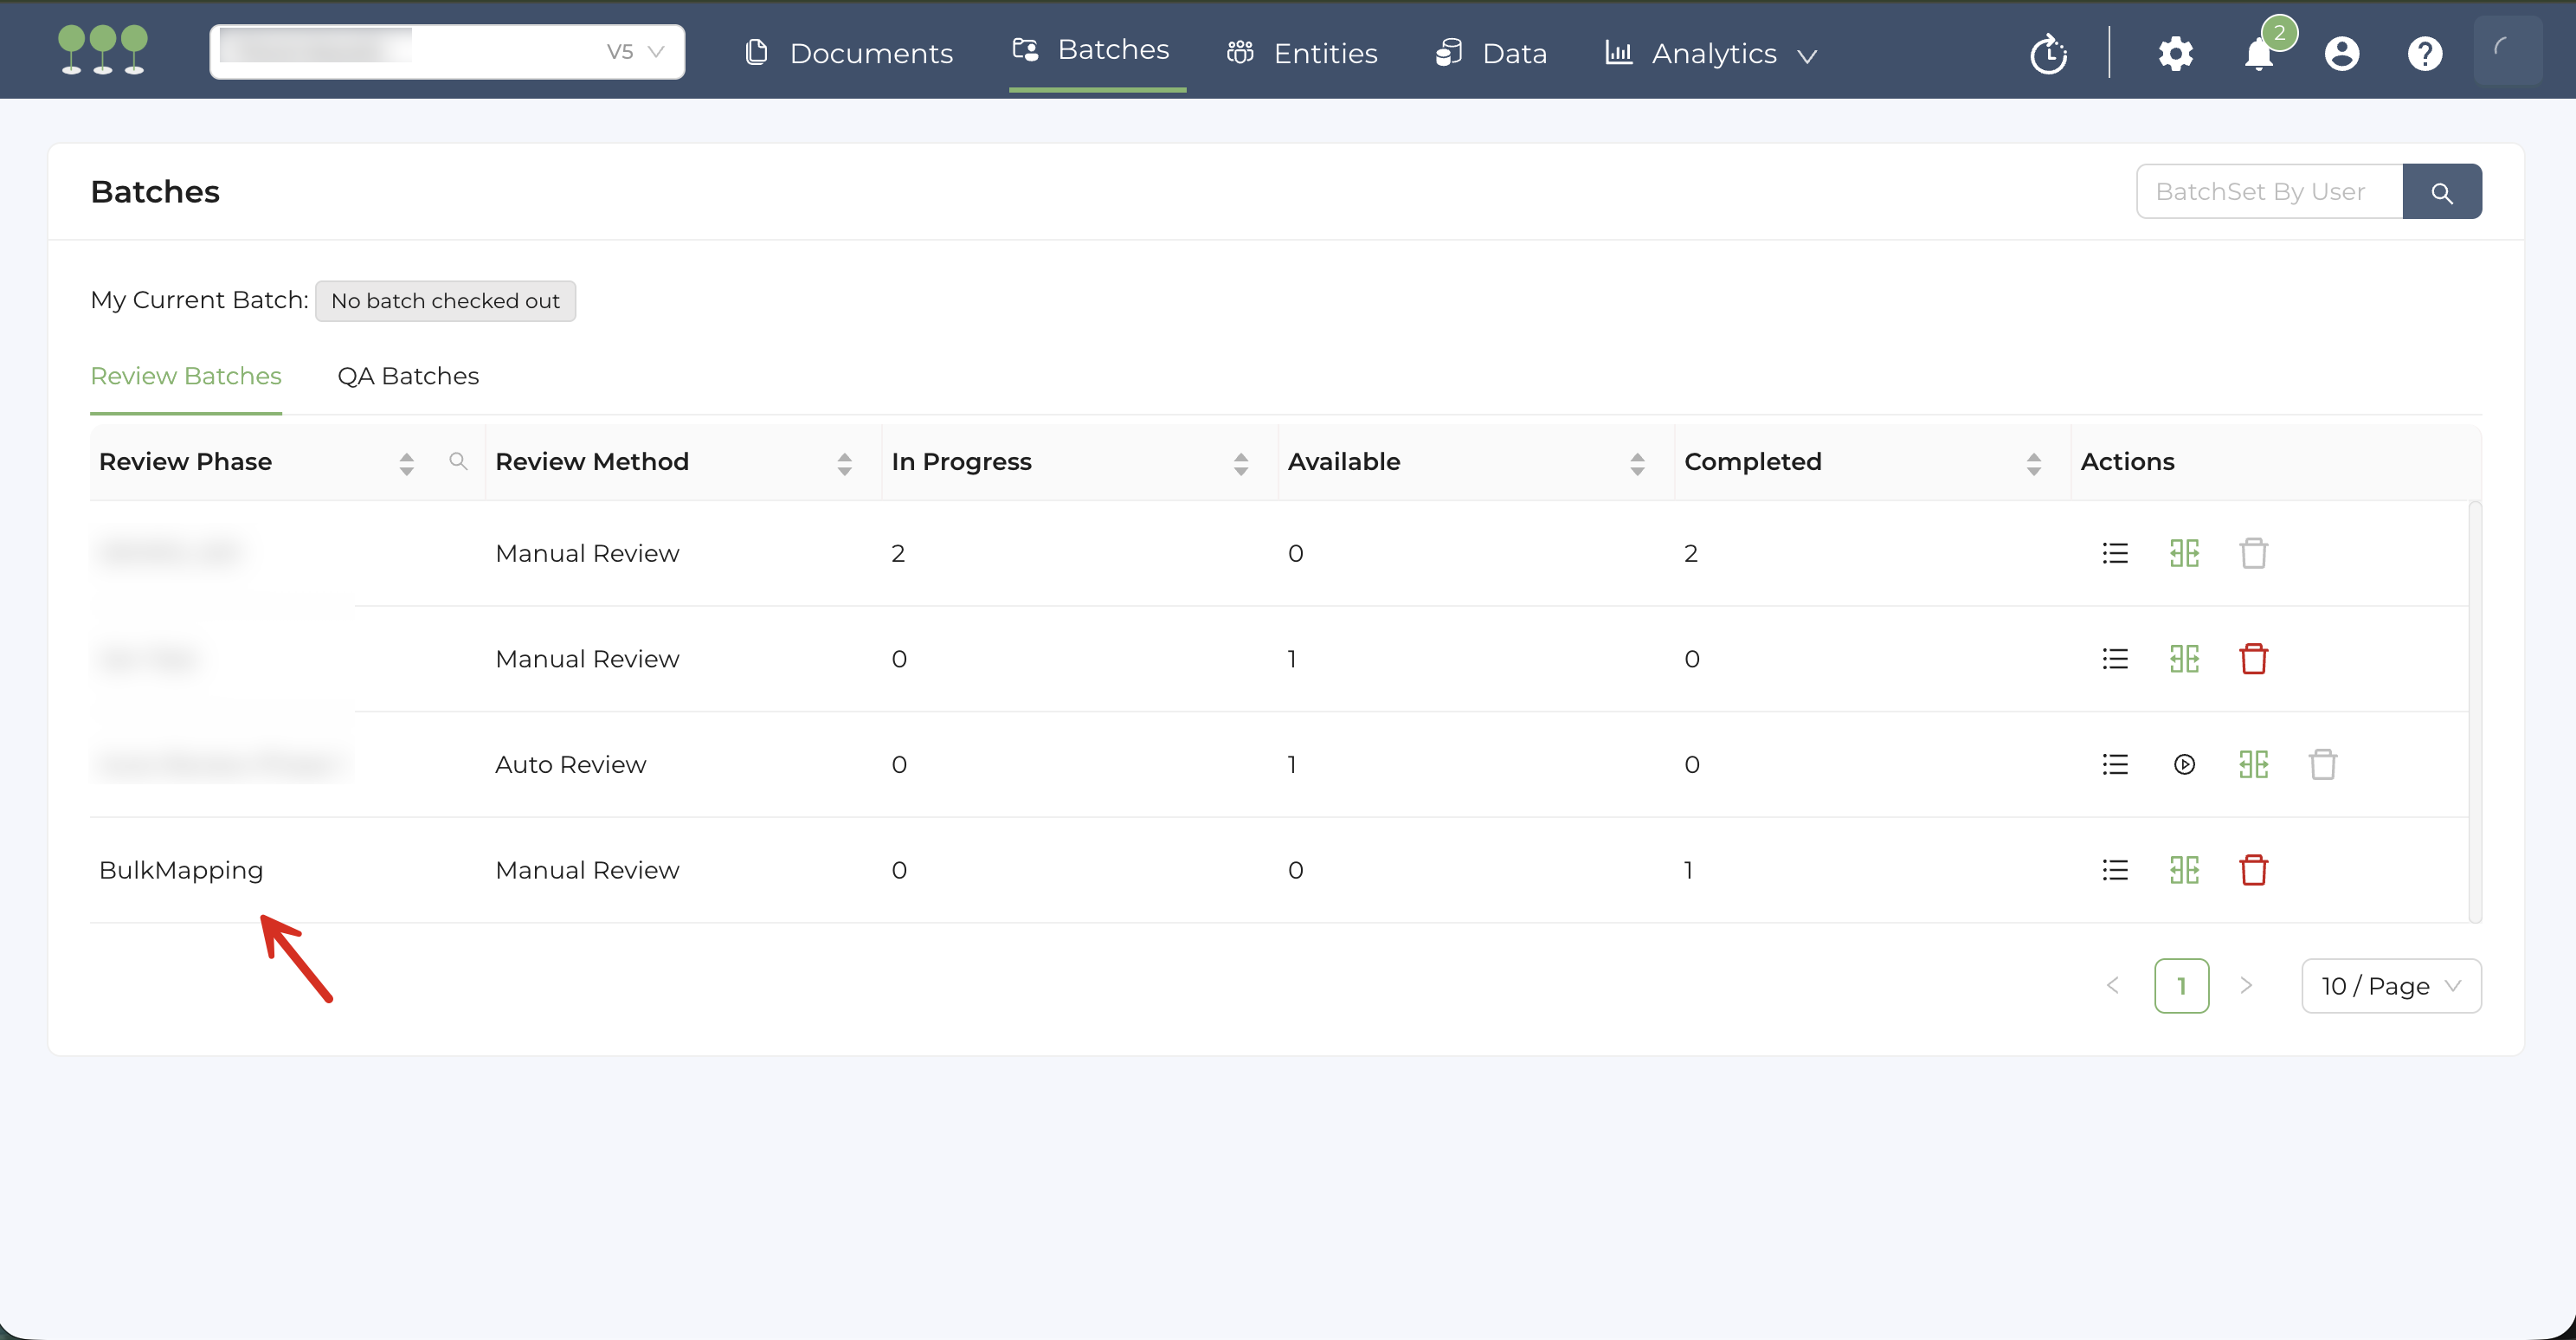
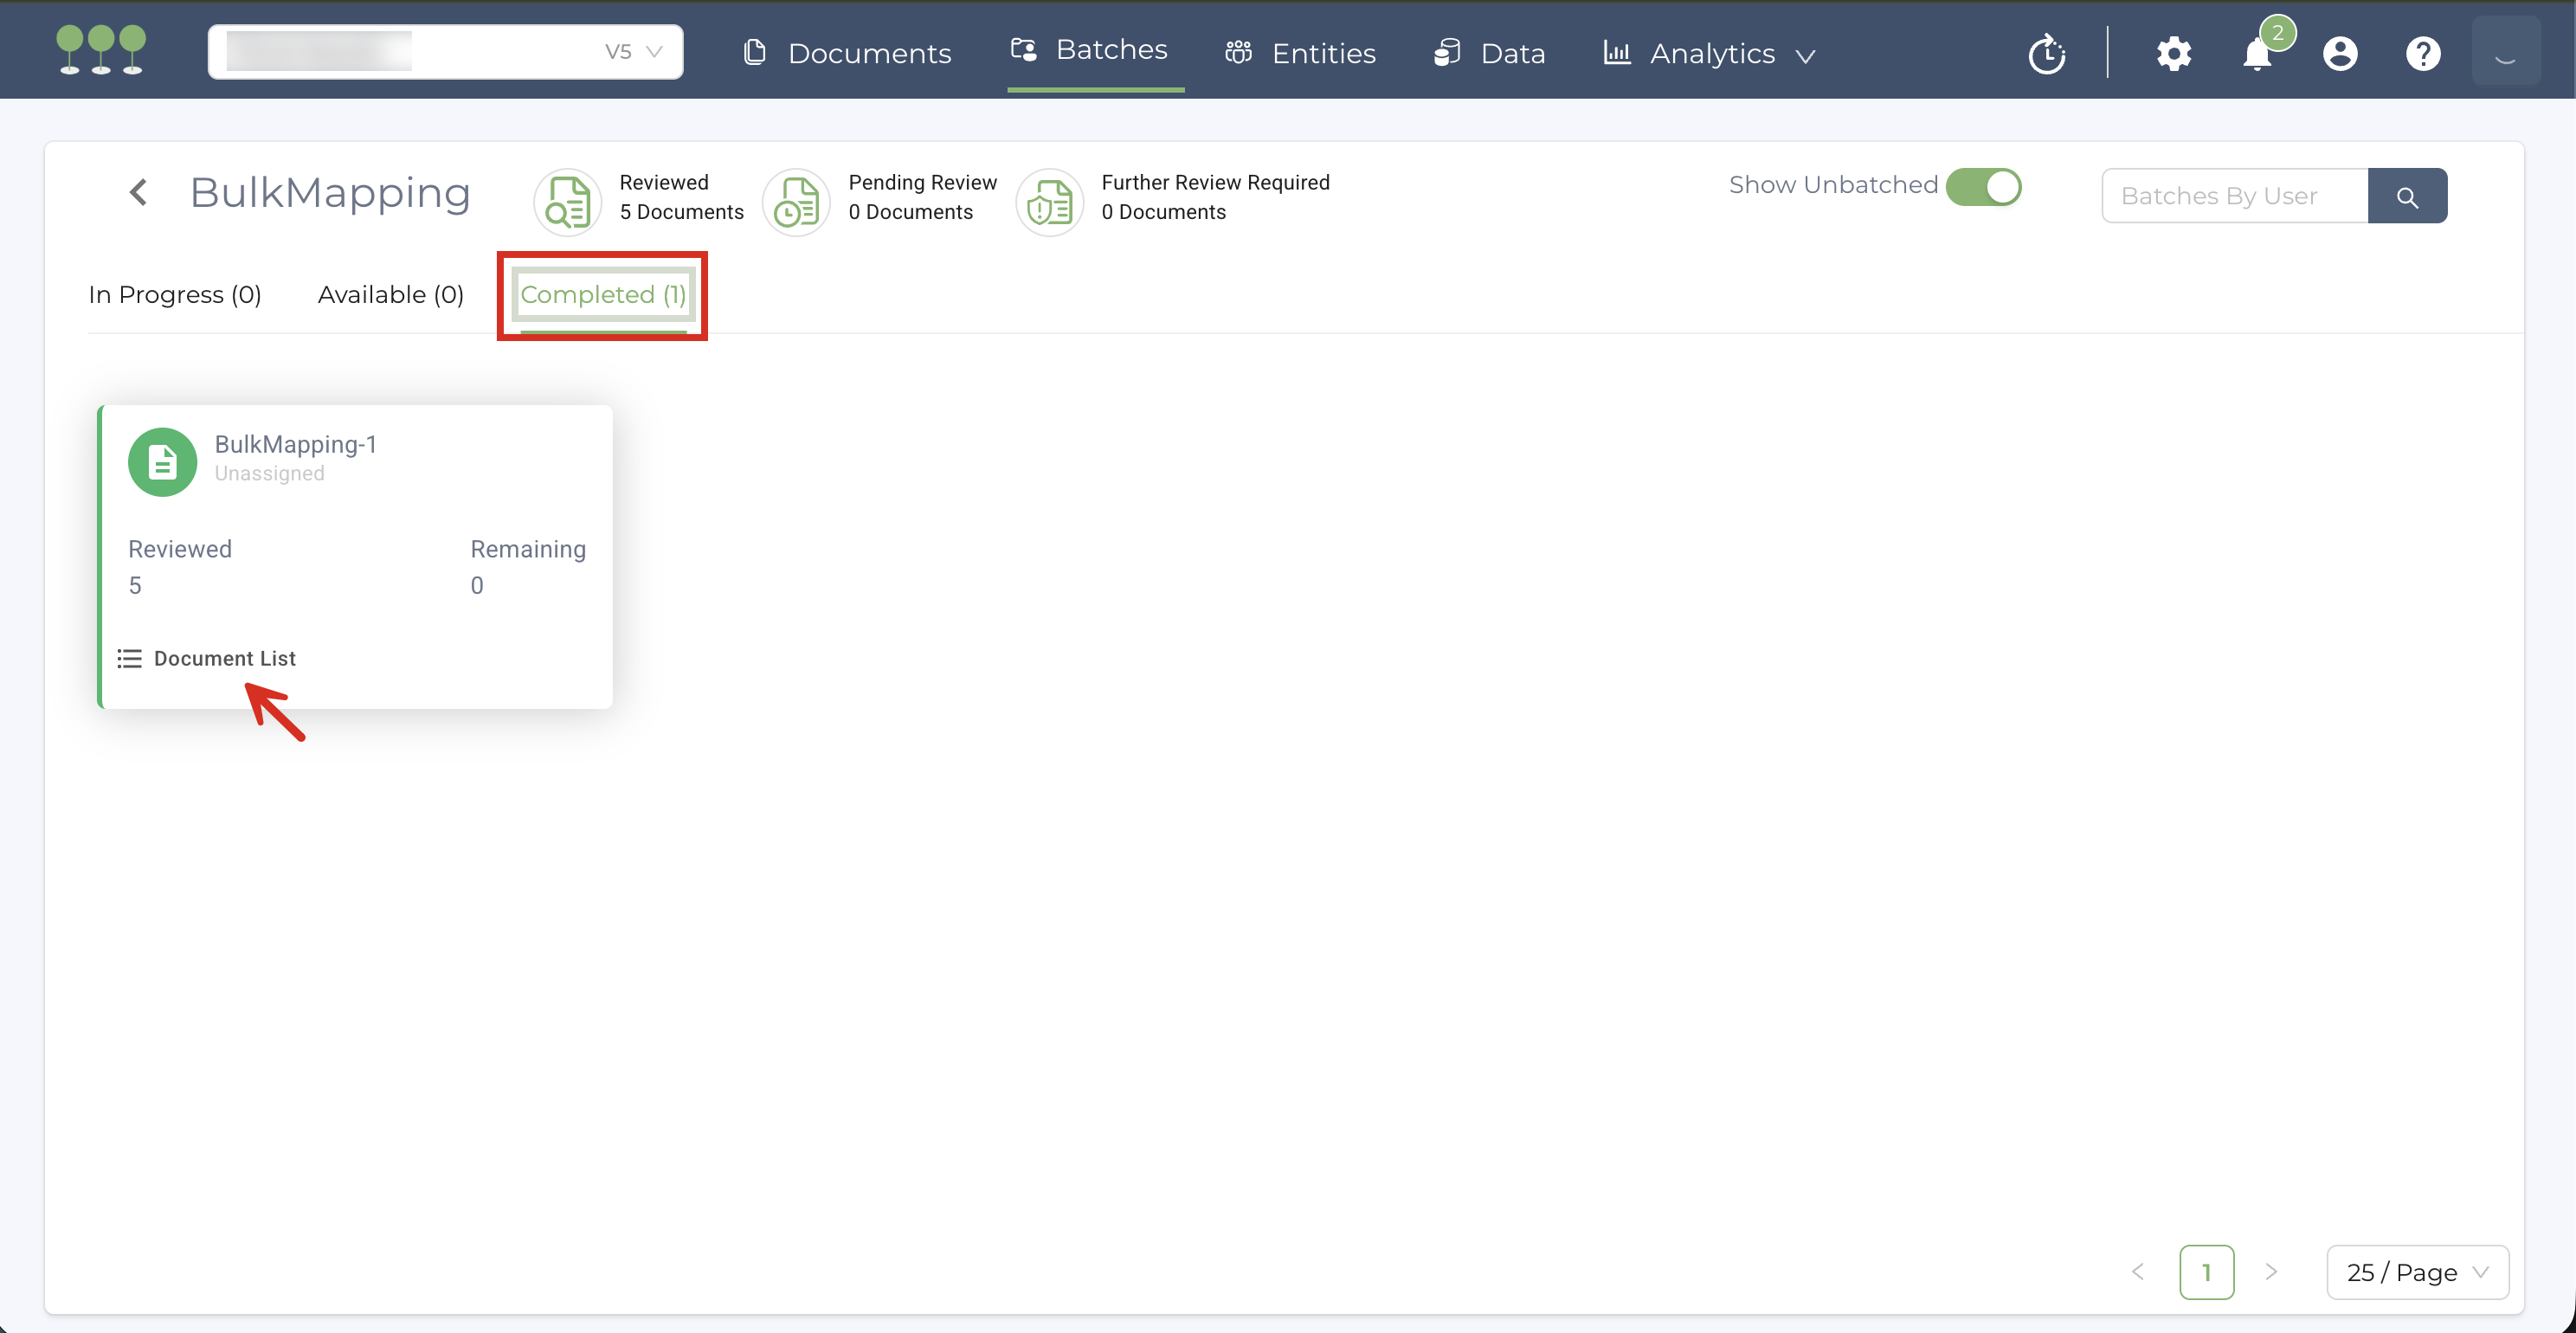
Once the Bulk Mapping jobs are finished, Canopy automatically organizes the bulk-mapped documents into a dedicated Manual Review Phase.
- Navigate to the Batches page.
- Locate and click on the Review Phase titled BulkMapping.
- In the detail view, select the Completed tab. This is where the system stores the batches that have finished the bulk mapping process.
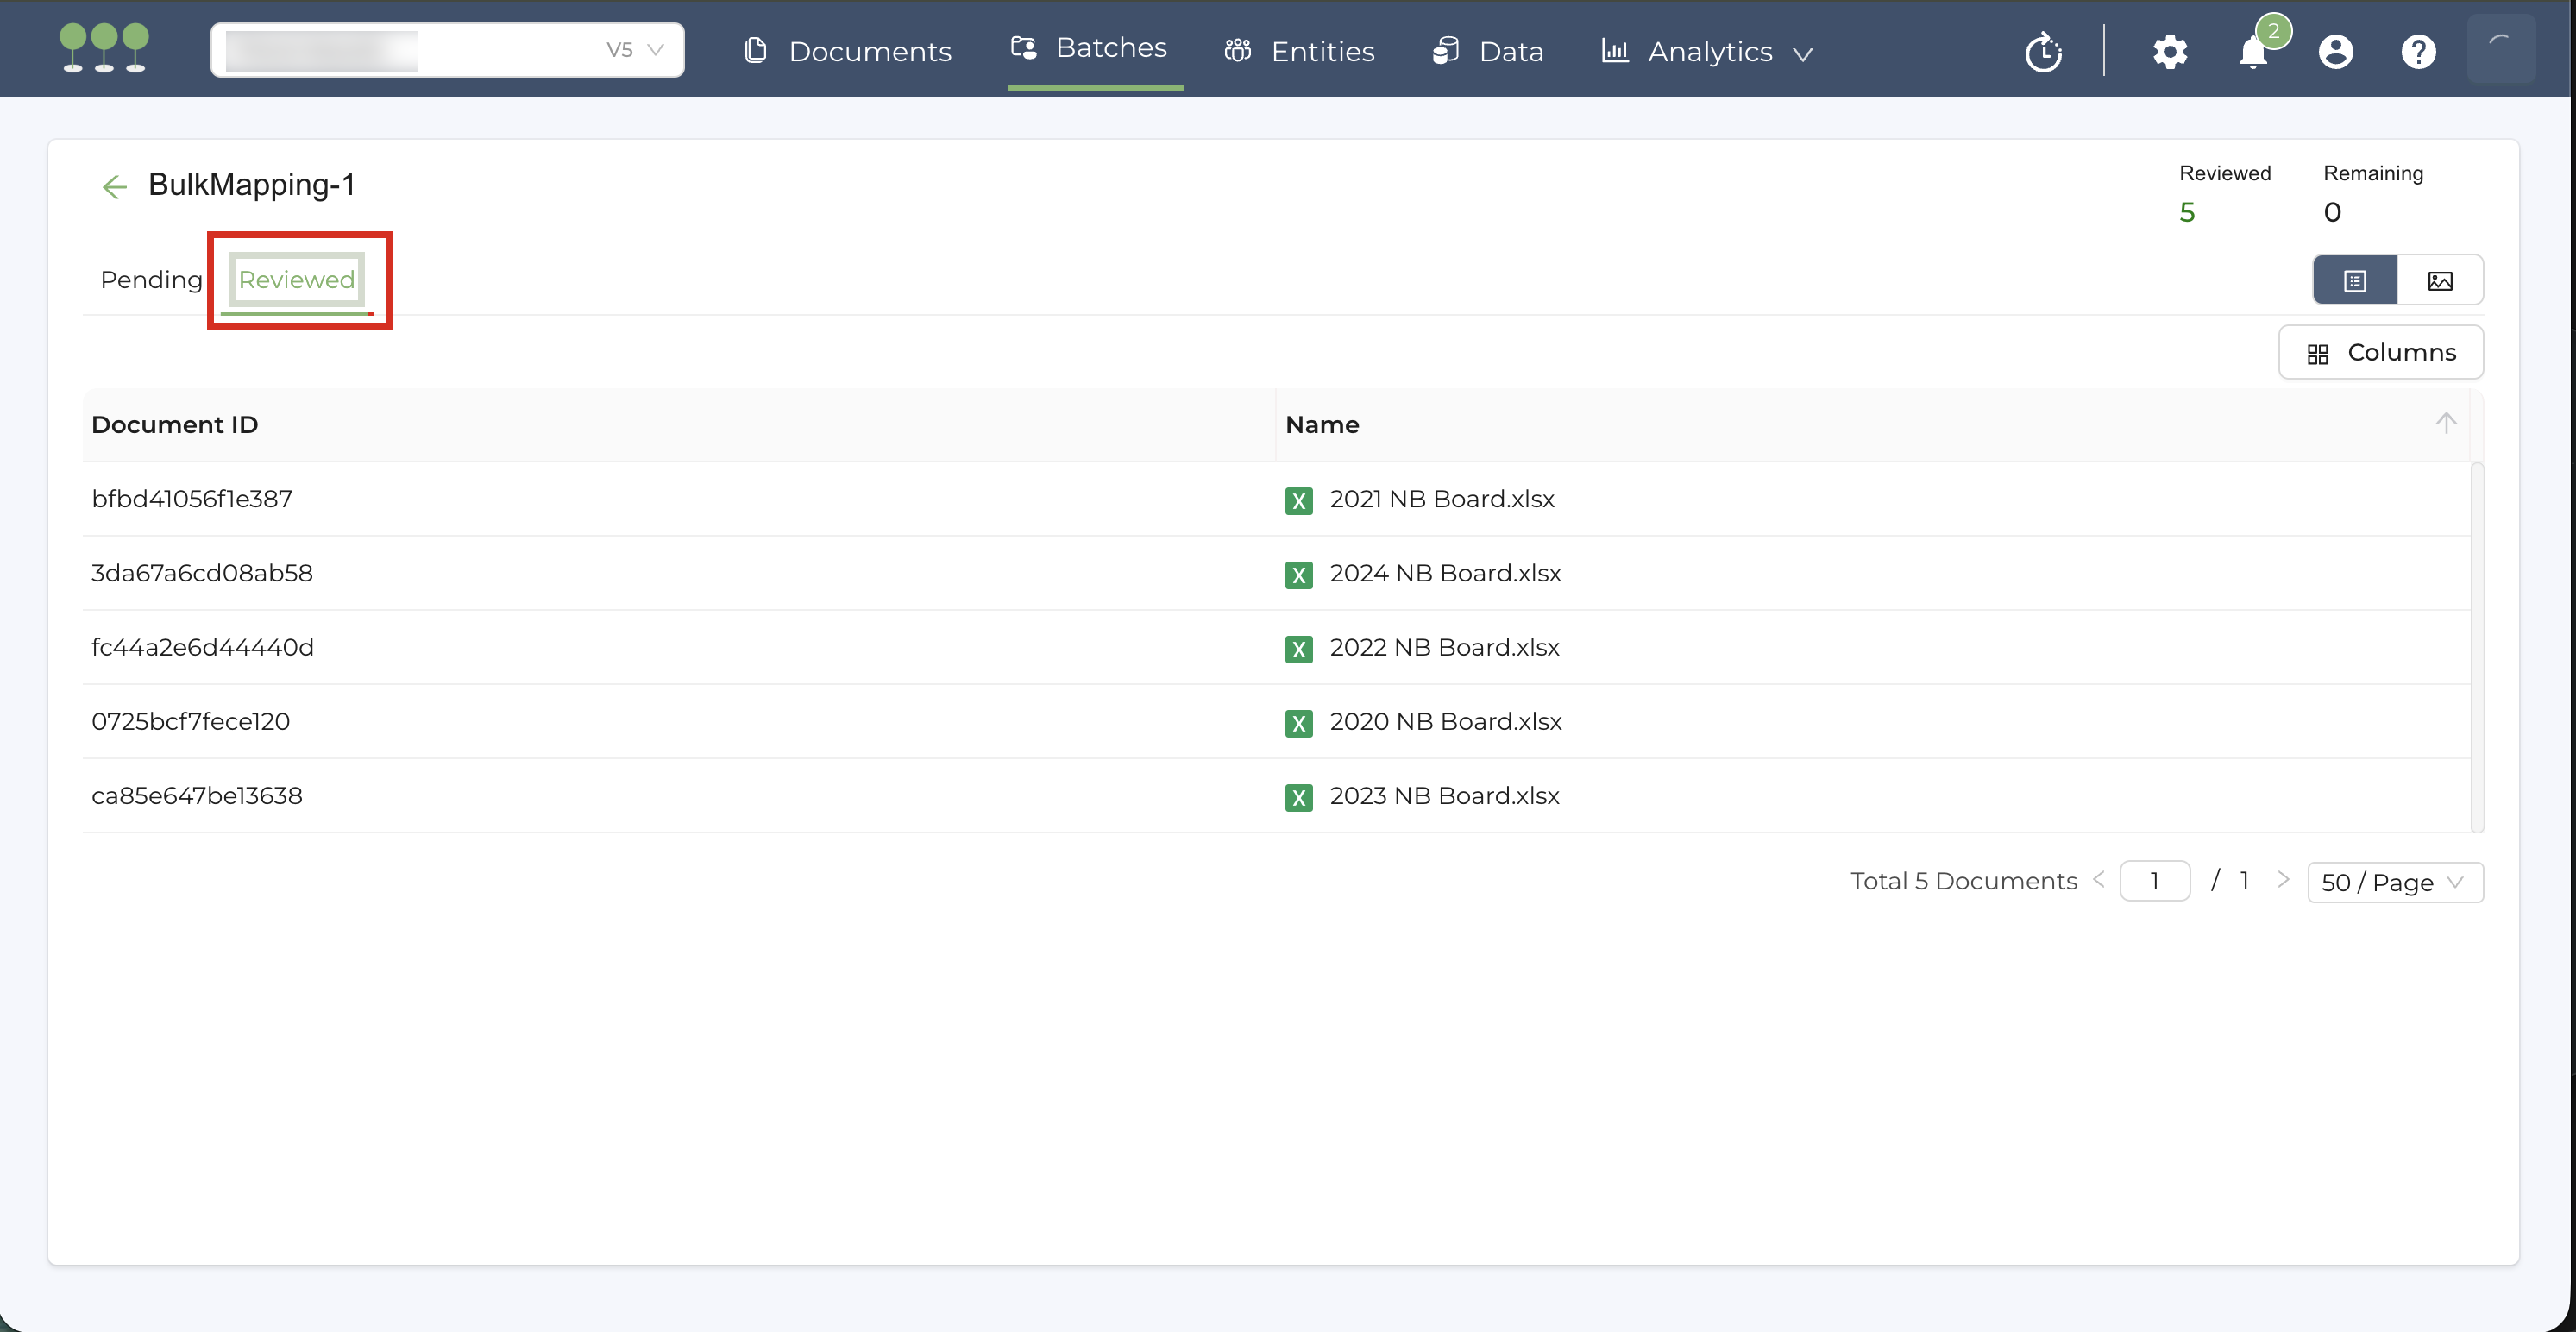
- On the batch, click Document List
- Select the Reviewed tab. This will display the full list of documents that have completed the Bulk Mapping job.
Users can use Review-related columns on the Document List to isolate successfully bulk-mapped files.
Add Columns: On the Document List, add the following columns to the data grid:
- Review Method,
- Review Phase
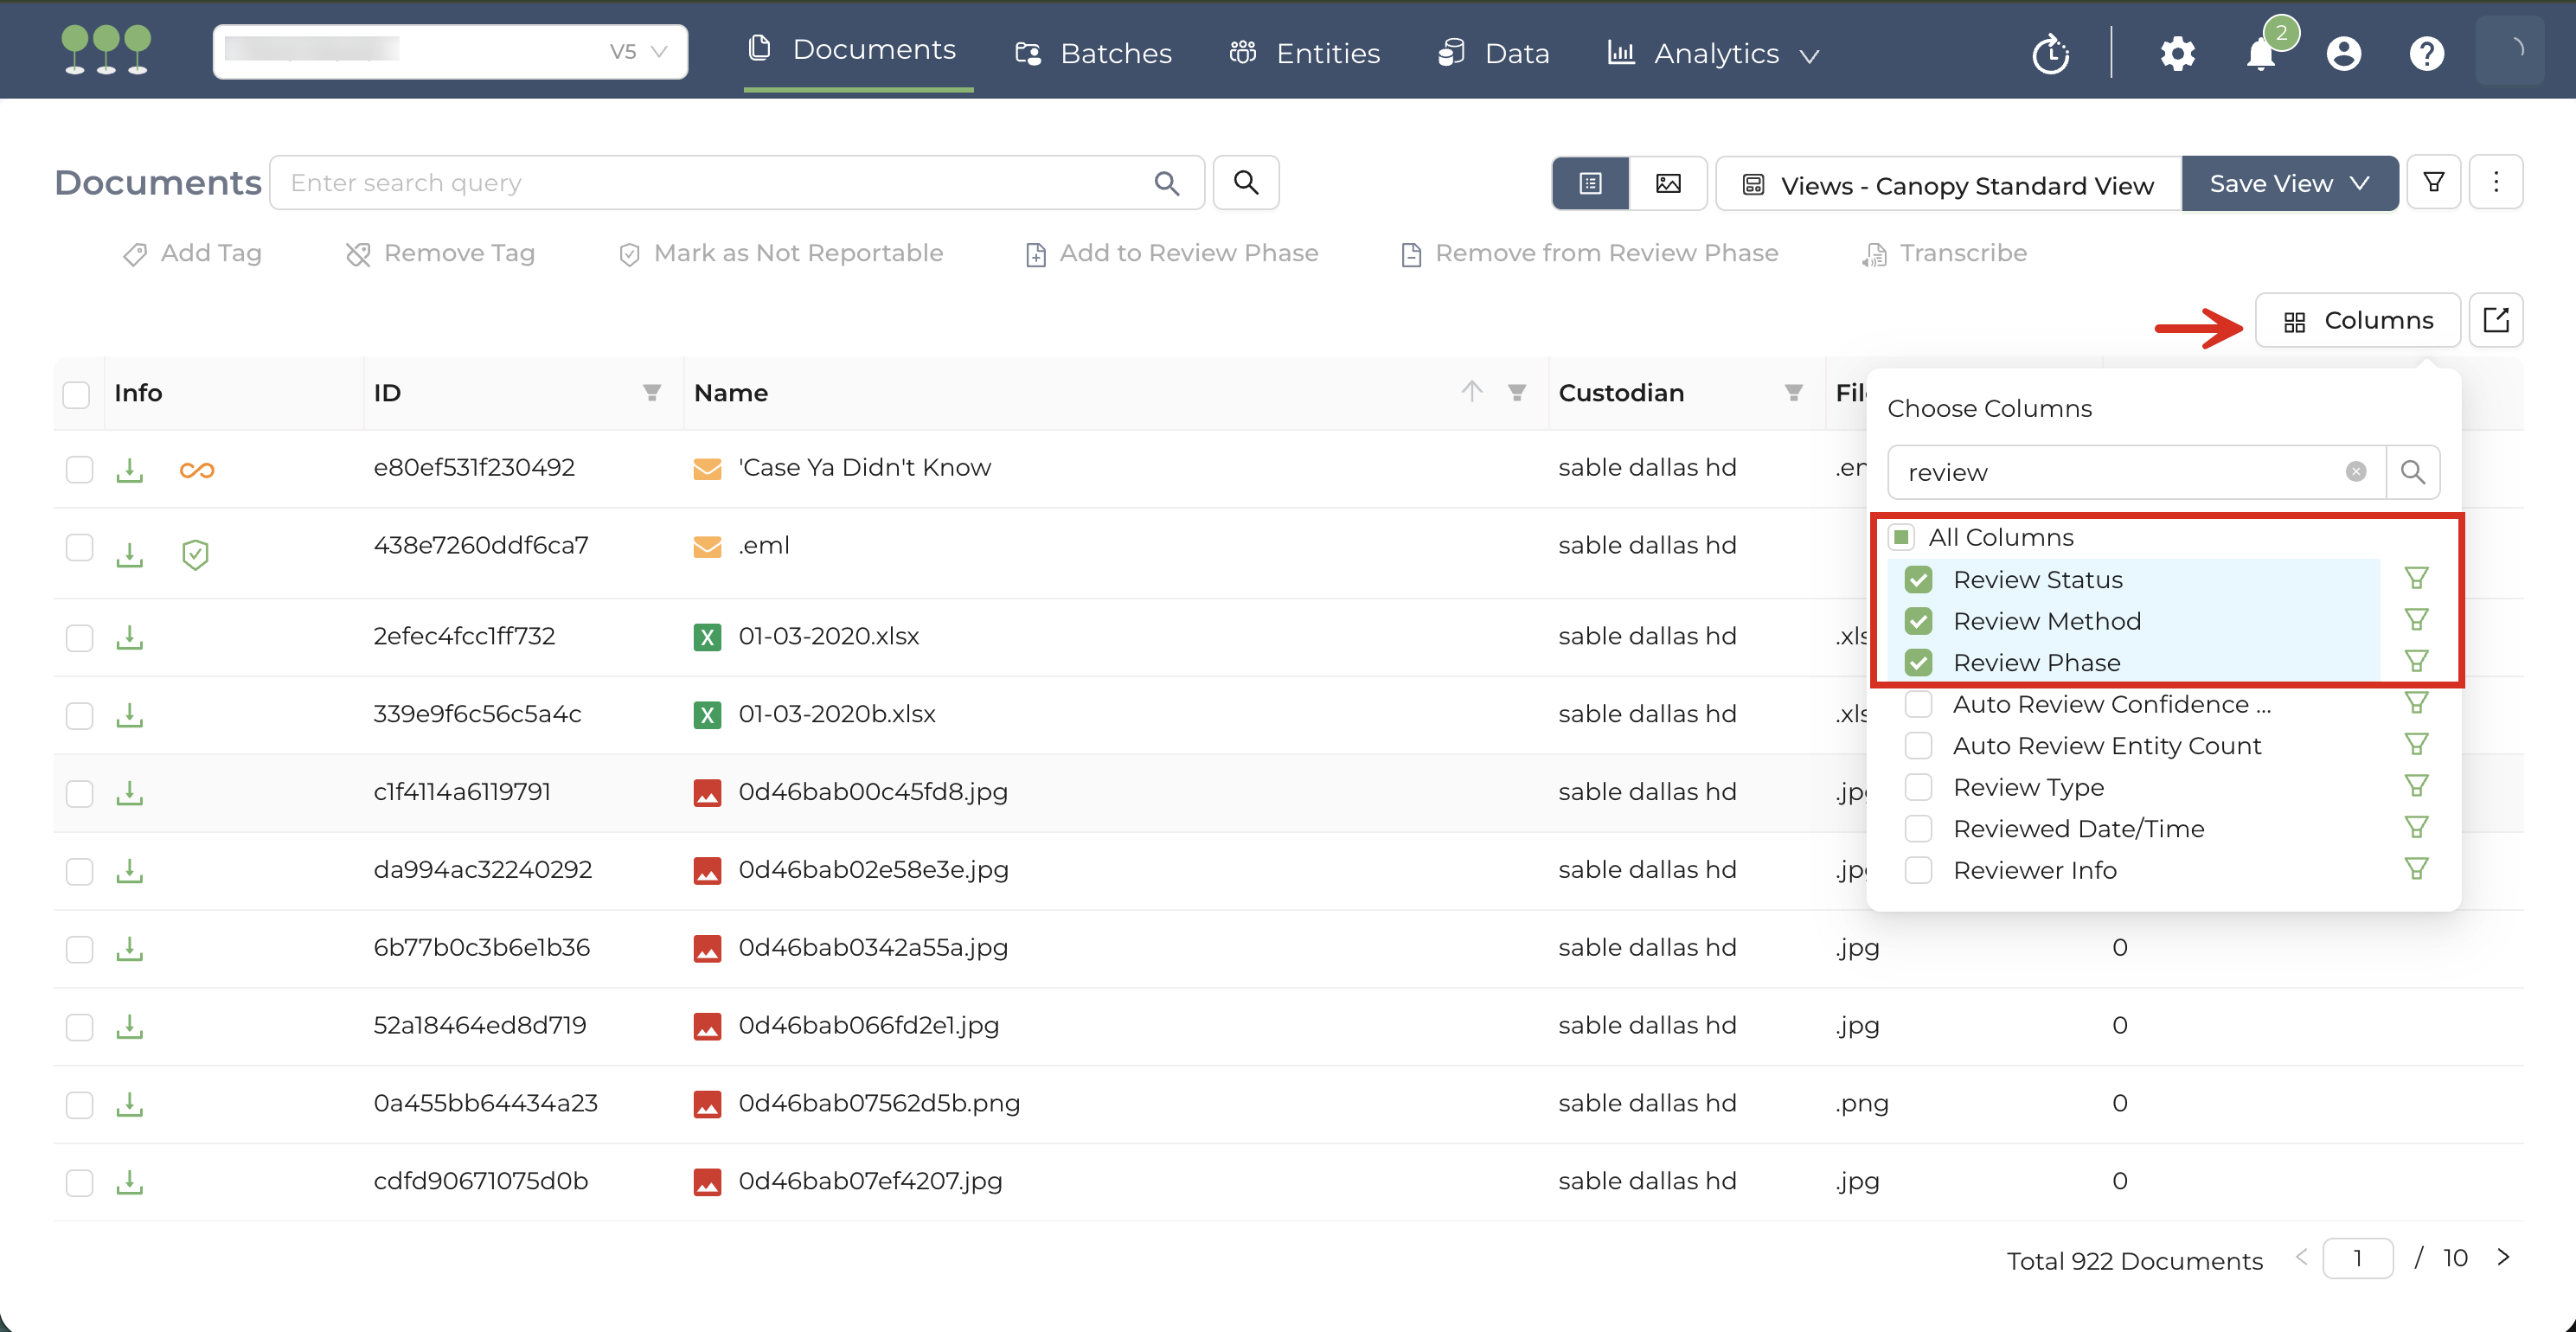
Filter for Bulk Mapping Result:
- Step 1: Select Manual Review from the Review Method.
- Step 2: Use the Review Phase column filter to select BulkMapping review phase.

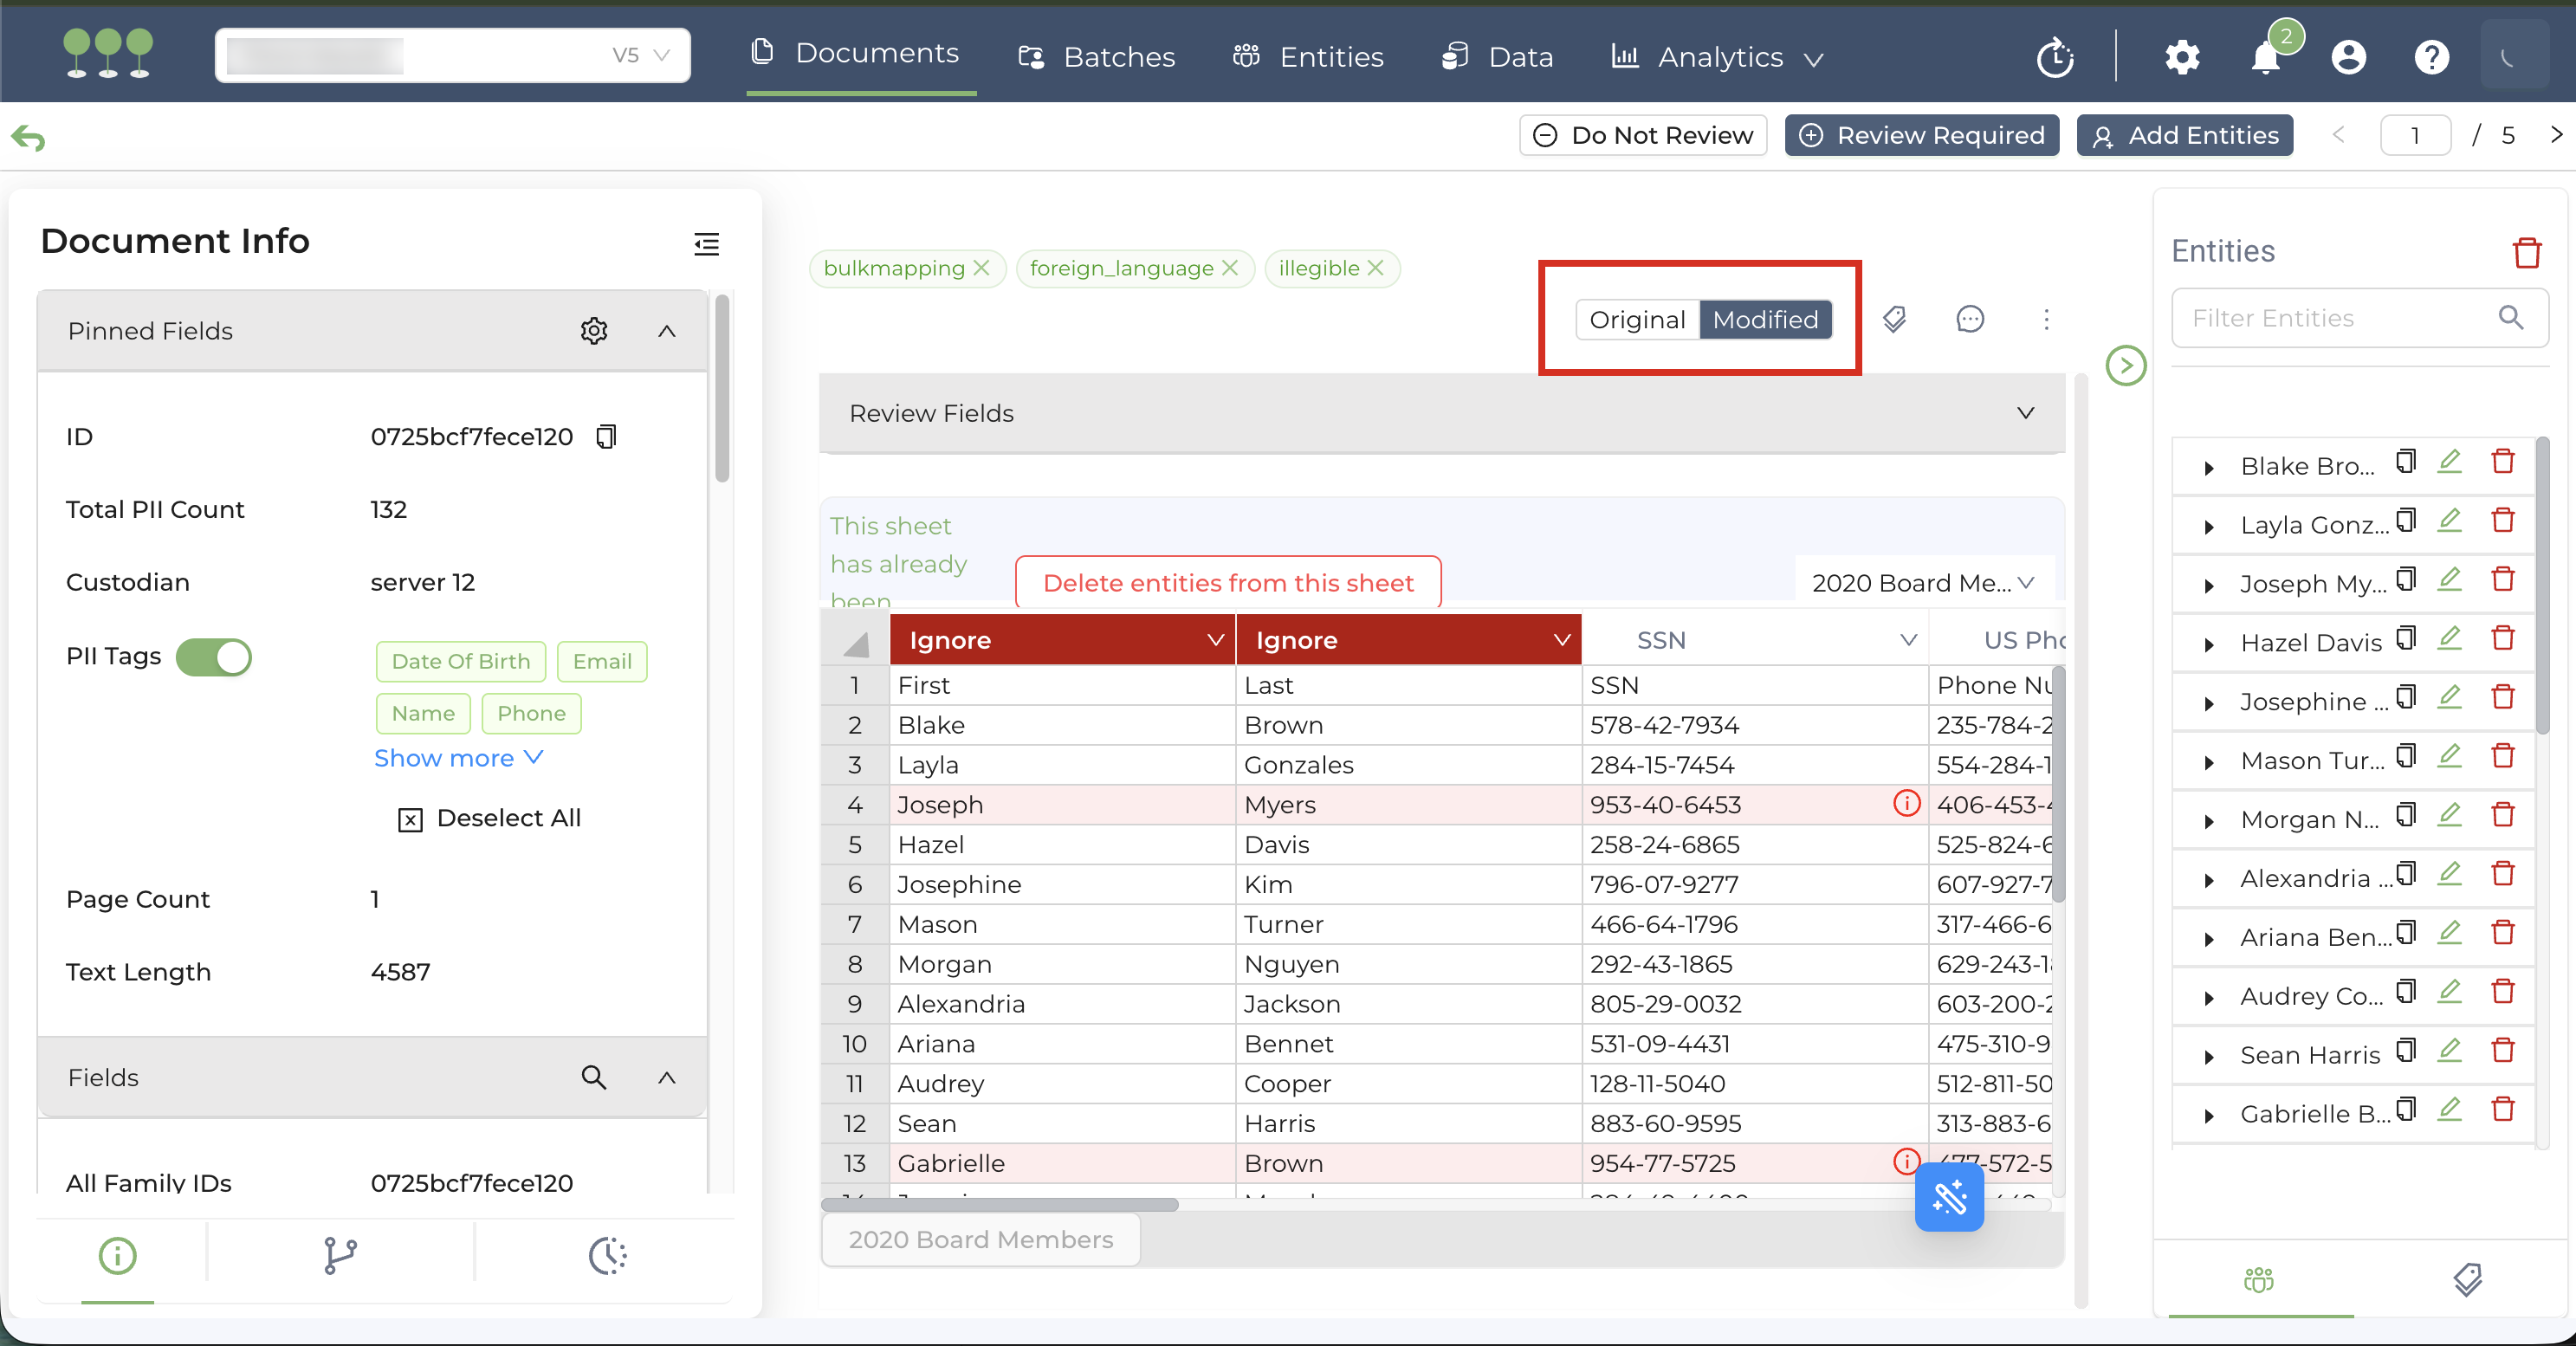
Once a Bulk Mapping job completes, all entities from your spreadsheet are automatically added into the target documents in Canopy. These entities are visible in the Entity Panel within the right sidebar of the Document View.
The Entity data displayed in the Document View is directly linked to the Raw Entities within the Entities Module. When the Bulk Mapping job completes, all propagated entities are automatically added to the Raw Entities pool. Any subsequent additions, edits, or deletions made in the Document View are dynamically updated in the Entities Module.
To maintain data auditability, Canopy separates the source files from the mapped spreadsheet data:
- Original tab: Contains the primary source document originally processed in Canopy.
- Modified tab: Contains the specific spreadsheet used for the most recent Bulk Mapping job.
Canopy supports one active mapping spreadsheet per document. If you upload a new spreadsheet to a document that has already been bulk-mapped:
- The new spreadsheet will overwrite the previous file in the Modified tab,
- And the new entity data will replace the previously propagated entities for that specific document.